
本章覆盖了Spring框架对控制反转(Inversion of Control,IoC)[1]理论的实现。
org.springframework.beans及org.springframework.context包 是Spring IoC容器的基础。BeanFactory 提供的高级配置机制,使得管理各种对象成为可能。 ApplicationContext 是BeanFactory的扩展,功能得到了进一步增强,比如更易 与Spring AOP集成、资源处理(国际化处理)、事件传递及各种不同应用层的context实现 (如针对web应用的WebApplicationContext)。
简而言之,BeanFactory提供了配制框架及基本功能,而 ApplicationContext 则增加了更多支持企业核心内容的功能。 ApplicationContext完全由BeanFactory扩展而来, 因而BeanFactory所具备的能力和行为也适用于ApplicationContext。
本章分为两部份,第一部份讲解 BeanFactory及ApplicationContext的基本原理, 而第二部份则针对ApplicationContext的功能进行讲解。
在Spring中,那些组成你应用程序的主体(backbone)及由Spring IoC容器所管理的对象,被称之为bean。 简单地讲,bean就是由Spring容器初始化、装配及管理的对象,除此之外,bean就与应用程序中的其他对象没有什么区别了。 而bean定义以及bean相互间的依赖关系将通过配置元数据来描述。
org.springframework.beans.factory.BeanFactory 是Spring IoC容器的实际代表者,IoC容器负责容纳此前所描述的bean,并对bean进行管理。
在Spring中,BeanFactory是IoC容器的核心接口。 它的职责包括:实例化、定位、配置应用程序中的对象及建立这些对象间的依赖。
Spring为我们提供了许多易用的BeanFactory实现, XmlBeanFactory就是最常用的一个。该实现将以XML方式描述组成应用的对象 以及对象间的依赖关系。XmlBeanFactory类将获取此XML配 置元数据,并用它来构建一个完全可配置的系统或应用。
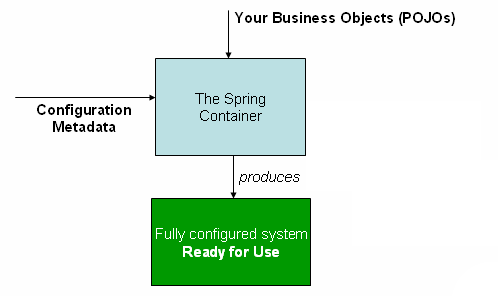
Spring IoC 容器
从上图可以看到,Spring IoC容器将读取配置元数据; 并通过它对应用中各个对象进行实例化、配置以及组装。通常情况下我们使用简单直观 的XML来作为配置元数据的描述格式。在XML配置元数据中我们可以对那些我们希望通过 Spring IoC容器管理的bean进行定义。
![[Note]](../images/admons/note.png) | Note |
|---|---|
到目前为止,基于XML的元数据是最常用到的配置元数据格式。然而,它并 不是唯一的描述格式。Spring IoC容器在这一点上是 完全开放的。由于采用基于XML的配置元数据格式非常简单, 因此 本章节的大部分内容将采用该格式来说明Spring IoC容器的关键概念和功能 同时你也可以在Section 3.11, “基于注解(Annotation-based)的配置”这一节中 看到Spring容器支持的另一种元数据格式的详细内容。 | |
在大多数的应用程序中,并不需要用显式的代码去实例化一个或多个的Spring IoC 容器实例。例如,在web应用程序中,我们只需要在web.xml中添加 (大约)8 行简单的XML描述符即可(参见Section 3.8.5, “ApplicationContext在WEB应用中的实例化”)。
Spring IoC容器至少包含一个bean定义,但大多数情况下会有多个bean定义。当使用 基于XML的配置元数据时,将在顶层的<beans/>元素中配置一个 或多个<bean/>元素。
bean定义与应用程序中实际使用的对象一一对应。通常情况下bean的定义包括:服务 层对象、数据访问层对象(DAO)、类似Struts Action的 表示层对象、Hibernate SessionFactory对象、JMS Queue对象等等。通常bean的定义并不与容器中的领域 对象相同,因为领域对象的创建和加载必须依赖具体的DAO和业务逻辑。.
以下是一个基于XML的配置元数据的基本结构:
<?xml version="1.0" encoding="UTF-8"?>
<beans xmlns="http://www.springframework.org/schema/beans"
       xmlns:xsi="http://www.w3.org/2001/XMLSchema-instance"
       xsi:schemaLocation="http://www.springframework.org/schema/beans
           http://www.springframework.org/schema/beans/spring-beans-2.5.xsd">

  <bean id="..." class="...">
    <!-- collaborators and configuration for this bean go here -->
  </bean>

  <bean id="..." class="...">
    <!-- collaborators and configuration for this bean go here -->
  </bean>

  <!-- more bean definitions go here -->

</beans>Spring IoC容器的实例化非常简单,如下面的例子:
ApplicationContext context = new ClassPathXmlApplicationContext(
        new String[] {"services.xml", "daos.xml"});

// an ApplicationContext is also a BeanFactory (via inheritance)
BeanFactory factory = context;将XML配置文件分拆成多个部分是非常有用的。为了加载多个XML文件生成一个 ApplicationContext实例,可以将文件路径作为字符串数组传给ApplicationContext构造器 。而bean factory将通过调用bean defintion reader从多个文件中读取bean定义。
通常情况下,Spring团队倾向于上述做法,因为这样各个配置并不会查觉到它们 与其他配置文件的组合。另外一种方法是使用一个或多个的<import/>元素 来从另外一个或多个文件加载bean定义。所有的<import/>元素必 须在<bean/>元素之前完成bean定义的导入。 让我们看个例子:
<beans>

    <import resource="services.xml"/>
    <import resource="resources/messageSource.xml"/>
    <import resource="/resources/themeSource.xml"/>

    <bean id="bean1" class="..."/>
    <bean id="bean2" class="..."/>

</beans>在上面的例子中,我们从3个外部文件:services.xml、 messageSource.xml及themeSource.xml 来加载bean定义。这里采用的都是相对路径,因此,此例中的services.xml 一定要与导入文件放在同一目录或类路径,而messageSource.xm l和themeSource.xml的文件位置必须放在导入文件所 在目录下的resources目录中。正如你所看到的那样,开头的斜杠 ‘/’实际上可忽略。因此不用斜杠‘/’可能会更好一点。根据Spring XML配置文件的 Schema(或DTD),被导入文件必须是完全有效的XML bean定义文件,且根节点必须为 <beans/> 元素。
Spring IoC容器将管理一个或多个bean,这些bean 将通过配置文件中的bean定义被创建(在XML格式中为<bean/> 元素)。
在容器内部,这些bean定义由BeanDefinition 对象来表示,该定义将包含以下信息:
全限定类名:这通常就是已定义bean的实际实现类。
bean行为的定义,这些定义将决定bean在容器中的行为(作用域、生命周期回调等等)
对其他bean的引用,这些引用bean也可以称之为协作bean(collaborators) 或依赖bean(dependencies).
创建bean实例时的其他配置设置。比如使用bean来定义连接池,可以通过属性或者构 造参数指定连接数,以及连接池大小限制等。
上述内容直接被翻译为每个bean定义包含的一组properties。下面的表格列出了部分 内容的详细链接:
Table 3.1. bean定义
| 名称 | 链接 |
|---|---|
| class | |
| name | |
| scope | |
| constructor arguments | |
| properties | |
| autowiring mode | |
| dependency checking mode | |
| lazy-initialization mode | |
| initialization method | |
| destruction method |
除了通过bean定义来描述要创建的指定bean的属性之外,某些 BeanFactory的实现也允许将那些非BeanFactory创建的、已有的用户 对象注册到容器中,比如使用DefaultListableBeanFactory 的registerSingleton(..) 方法。不过大多数应用还是采用 元数据定义为主。
每个bean都有一个或多个id(或称之为标识符或名称,在术语 上可以理解成一回事)。这些id在当前IoC容器中必须唯一。如果 一个bean有多个id,那么其他的id在本质上将被认为是别名。
当使用基于XML的配置元数据时,将通过id或 name属性来指定bean标识符。id属性具有唯一性, 而且是一个真正的XML ID属性,因此其他xml元素在引用该id时,可以利用XML解析器的 验证功能。通常情况下最好为bean指定一个id。尽管XML规范规定了XML ID命名的有效 字符,但是bean标识符的定义不受该限制,因为除了使用指定的XML字符来作为id,还可 以为bean指定别名,要实现这一点可以在name属性中使用逗号、 冒号或者空格将多个id分隔。
值得注意的是,为一个bean提供一个name并不是必须的,如果没有指定,那么容 器将为其生成一个惟一的name。对于不指定name属性的原因我们会在后面介绍(比如 内部bean就不需要)。
在对bean进行定义时,除了使用id属性来指定名称 之外,为了提供多个名称,需要通过name属性来加以指定 。而所有的这些名称都指向同一个bean,在某些情况下提供别名非常有用,比如 为了让应用的每一个组件能更容易的对公共组件进行引用。
然而,在定义bean时就指定所有的别名并不是总是恰当的。有时我们期望 能在当前位置为那些在别处定义的bean引入别名。在XML配置文件中,可用 <alias/> 元素来完成bean别名的定义。如:
<alias name="fromName" alias="toName"/>
这里如果在容器中存在名为fromName的bean定义, 在增加别名定义之后,也可以用toName来引用。
考虑一个更为具体的例子,组件A在XML配置文件中定义了一个名为 componentA-dataSource的DataSource bean。但组件B却想在其XML文件中 以componentB-dataSource的名字来引用此bean。而且在主程序MyApp的XML配 置文件中,希望以myApp-dataSource的名字来引用此bean。最后容器加载三个 XML文件来生成最终的ApplicationContext,在此情形下,可通过在MyApp XML 文件中添加下列alias元素来实现:
<alias name="componentA-dataSource" alias="componentB-dataSource"/>
<alias name="componentA-dataSource" alias="myApp-dataSource" />
这样一来,每个组件及主程序就可通过唯一名字来引用同一个数据源而互不干扰。
从本质上来说,bean定义描述了如何创建一个或多个对象实例。当需要的时候, 容器会从bean定义列表中取得一个指定的bean定义,并根据bean定义里面的配置元数据 使用反射机制来创建(或取得)一个实际的对象。
当采用XML描述配置元数据时,将通过<bean/>元素的 class属性来指定实例化对象的类型。class 属性 (对应BeanDefinition实例的 Class属性)通常是必须的(不过也有两种例外的情形,见 Section 3.2.3.2.3, “使用实例工厂方法实例化”和 Section 3.6, “bean定义的继承”)。class属性主要有两种用途 :在大多数情况下,容器将直接通过反射调用指定类的构造器来创建bean(这有点类似于 在Java代码中使用new操作符);在极少数情况下,容器将调用 类的静态工厂方法来创建bean实例,class 属性将用来指定实际具有静态工厂方法的类(至于调用静态工厂 方法创建的对象类型是当前class还是其他的class则无关紧要)。
当采用构造器来创建bean实例时,Spring对class并没有特殊的要求, 我们通常使用的class都适用。也就是说,被创建的类并不需要实现任何特定的 接口,或以特定的方式编码,只要指定bean的class属性即可。不过根据所采用 的IoC类型,class可能需要一个默认的空构造器。
此外,IoC容器不仅限于管理JavaBean,它可以管理任意 的类。不过大多数使用Spring的人喜欢使用实际的JavaBean(具有默认的(无参)构造器 及setter和getter方法),但在容器中使用非bean形式(non-bean style)的类也是可 以的。比如遗留系统中的连接池,很显然它与JavaBean规范不符,但Spring也能管理它。
当使用基于XML的元数据配置文件,可以这样来指定bean类:
<bean id="exampleBean" class="examples.ExampleBean"/>

<bean name="anotherExample" class="examples.ExampleBeanTwo"/>
给构造函数指定参数以及为bean实例设置属性将在随后的 部分中谈及。
当采用静态工厂方法创建bean时,除了需要指定class 属性外,还需要通过factory-method属性来指定创建bean实例 的工厂方法。Spring将调用此方法(其可选参数接下来介绍)返回实例对象,就此而言, 跟通过普通构造器创建类实例没什么两样。
下面的bean定义展示了如何通过工厂方法来创建bean实例。注意,此定义并 未指定返回对象的类型,仅指定该类包含的工厂方法。在此例中, createInstance()必须是一个static方法。
<bean id="exampleBean"
      class="examples.ExampleBean2"
      factory-method="createInstance"/>
给工厂方法指定参数以及为bean实例设置属性将在随后的部份中谈及。
与 使用静态工厂方法实例化类似,用来进行实例化的非静态实例工厂方法位 于另外一个bean中,容器将调用该bean的工厂方法来创建一个新的bean实例。为使 用此机制,class属性必须为空,而factory-bean 属性必须指定为当前(或其祖先)容器中包含工厂方法的bean的名称,而该 工厂bean的工厂方法本身必须通过factory-method属性来设定。
<!-- the factory bean, which contains a method called createInstance() -->
<bean id="serviceLocator" class="com.foo.DefaultServiceLocator">
  <!-- inject any dependencies required by this locator bean -->
</bean>

<!-- the bean to be created via the factory bean -->
<bean id="exampleBean"
      factory-bean="serviceLocator"
      factory-method="createInstance"/>
虽然设置bean属性 的机制仍然在这里被提及,但隐式的做法是由工厂bean自己来管理以及通过依 赖注入(DI)来进行配置。
| Note |
|---|---|
Spring文档中的factory bean指的是配置在Spring容器中通过使用 实例 或 静态工厂方法创建对象的一种bean。而文档中的FactoryBean (注意首字母大写)指的是Spring特有的 FactoryBean。 | |
从本质上讲,BeanFactory仅仅只是一个 维护bean定义以及相互依赖关系的高级工厂接口。通过BeanFactory 我们可以访问bean定义。下面的例子创建了一个bean工厂,此工厂 将从xml文件中读取bean定义:
Resource res = new FileSystemResource("beans.xml");
BeanFactory factory = new XmlBeanFactory(res);基本上就这些了,接着使用getBean(String) 方法就可以取得bean的实例;BeanFactory 提供的方法极其简单。 BeanFactory接口提供 了非常多的方法,但是对于我们的应用来说,最好永远不要调用它们,当然也包括 使用getBean(String)方法,这样可以避免我们对 Spring API的依赖。
典型的企业应用不会只由单一的对象(或Spring的术语bean)组成。毫无疑问,即使最简单的系统也需要多个对象共同来展示给用户一个整体的应用。接下来的的内容除了阐述如何单独定义一系列bean外,还将描述如何让这些bean对象一起协同工作来实现一个完整的真实应用。
依赖注入(DI)背后的基本原理是对象之间的依赖关系(即一起工作的其它对象)只会通过以下几种方式来实现:构造器的参数、工厂方法的参数,或给由构造函数或者工厂方法创建的对象设置属性。因此,容器的工作就是创建bean时注入那些依赖关系。相对于由bean自己来控制其实例化、直接在构造器中指定依赖关系或者类似服务定位器(Service Locator)模式这3种自主控制依赖关系注入的方法来说,控制从根本上发生了倒转,这也正是控制反转(Inversion of Control, IoC) 名字的由来。
应用DI原则后,代码将更加清晰。而且当bean自己不再担心对象之间的依赖关系(甚至不知道依赖的定义指定地方和依赖的实际类)之后,实现更高层次的松耦合将易如反掌。DI主要有两种注入方式,即Setter注入和构造器注入
。基于构造器的DI通过调用带参数的构造器来实现,每个参数代表着一个依赖。此外,还可通过给stattic工厂方法传参数来构造bean。接下来的介绍将认为给构造器传参与给静态工厂方法传参是类似的。下面展示了只能使用构造器参数来注入依赖关系的例子。请注意,这个类并没有什么特别之处。
public class SimpleMovieLister {

    // the SimpleMovieLister has a dependency on a MovieFinder
    private MovieFinder movieFinder;

    // a constructor so that the Spring container can 'inject' a MovieFinder
    public SimpleMovieLister(MovieFinder movieFinder) {
        this.movieFinder = movieFinder;
    }

    // business logic that actually 'uses' the injected MovieFinder is omitted...
}构造器参数解析根据参数类型进行匹配,如果bean的构造器参数类型定义非常明确,那么在bean被实例化的时候,bean定义中构造器参数的定义顺序就是这些参数的顺序,依次进行匹配,比如下面的代码
package x.y;

public class Foo {

    public Foo(Bar bar, Baz baz) {
        // ...
    }
}
上述例子中由于构造参数非常明确(这里我们假定 Bar和 Baz之间不存在继承关系)。因此下面的配置即使没有明确指定构造参数顺序(和类型),也会工作的很好。
<beans>
    <bean name="foo" class="x.y.Foo">
        <constructor-arg>
            <bean class="x.y.Bar"/>
        </constructor-arg>
        <constructor-arg>
            <bean class="x.y.Baz"/>
        </constructor-arg>
    </bean>
</beans>我们再来看另一个bean,该bean的构造参数类型已知,匹配也没有问题(跟前面的例子一样)。但是当使用简单类型时,比如<value>true<value>,Spring将无法知道该值的类型。不借助其他帮助,他将无法仅仅根据参数类型进行匹配,比如下面的这个例子:
package examples;

public class ExampleBean {

    // No. of years to the calculate the Ultimate Answer
    private int years;

    // The Answer to Life, the Universe, and Everything
    private String ultimateAnswer;

    public ExampleBean(int years, String ultimateAnswer) {
        this.years = years;
        this.ultimateAnswer = ultimateAnswer;
    }
}针对上面的场景可以通过使用'type'属性来显式指定那些简单类型的构造参数的类型,比如:
<bean id="exampleBean" class="examples.ExampleBean">
  <constructor-arg type="int" value="7500000"/>
  <constructor-arg type="java.lang.String" value="42"/>
</bean>
通过调用无参构造器或无参static工厂方法实例化bean之后,调用该bean的setter方法,即可实现基于setter的DI。
下面的例子将展示只使用setter注入依赖。注意,这个类并没有什么特别之处,它就是普通的Java类。
public class SimpleMovieLister {

    // the SimpleMovieLister has a dependency on the MovieFinder
    private MovieFinder movieFinder;

    // a setter method so that the Spring container can 'inject' a MovieFinder
    public void setMovieFinder(MovieFinder movieFinder) {
        this.movieFinder = movieFinder;
    }

    // business logic that actually 'uses' the injected MovieFinder is omitted...
}BeanFactory对于它所管理的bean提供两种注入依赖方式(实际上它也支持同时使用构造器注入和Setter方式注入依赖)。需要注入的依赖将保存在BeanDefinition中,它能根据指定的PropertyEditor实现将属性从一种格式转换成另外一种格式。然而,大部份的Spring用户并不需要直接以编程的方式处理这些类,而是采用XML的方式来进行定义,在内部这些定义将被转换成相应类的实例,并最终得到一个Spring IoC容器实例。
处理bean依赖关系通常按以下步骤进行:
根据定义bean的配置(文件)创建并初始化BeanFactory实例(大部份的Spring用户使用支持XML格式配置文件的BeanFactory或ApplicationContext实现)。
每个bean的依赖将以属性、构造器参数、或静态工厂方法参数的形式出现。当这些bean被实际创建时,这些依赖也将会提供给该bean。
每个属性或构造器参数既可以是一个实际的值,也可以是对该容器中另一个bean的引用。
每个指定的属性或构造器参数值必须能够被转换成特定的格式或构造参数所需的类型。默认情况下,Spring会以String类型提供值转换成各种内置类型,比如int、long、String、boolean等。
Spring会在容器被创建时验证容器中每个bean的配置,包括验证那些bean所引用的属性是否指向一个有效的bean(即被引用的bean也在容器中被定义)。然而,在bean被实际创建之前,bean的属性并不会被设置。对于那些singleton类型和被设置为提前实例化的bean(比如ApplicationContext中的singleton bean)而言,bean实例将与容器同时被创建。而另外一些bean则会在需要的时候被创建,伴随着bean被实际创建,作为该bean的依赖bean以及依赖bean的依赖bean(依此类推)也将被创建和分配。
通常情况下,你可以信赖Spring,它会在容器加载时发现配置错误(比如对无效bean的引用以及循环依赖)。Spring会在bean创建时才去设置属性和依赖关系(只在需要时创建所依赖的其他对象)。这意味着即使Spring容器被正确加载,当获取一个bean实例时,如果在创建bean或者设置依赖时出现问题,仍然会抛出一个异常。因缺少或设置了一个无效属性而导致抛出一个异常的情况的确是存在的。因为一些配置问题而导致潜在的可见性被延迟,所以在默认情况下,ApplicationContext实现中的bean采用提前实例化的singleton模式。在实际需要之前创建这些bean将带来时间与内存的开销。而这样做的好处就是ApplicationContext被加载的时候可以尽早的发现一些配置的问题。不过用户也可以根据需要采用延迟实例化来替代默认的singleton模式。
如果撇开循环依赖不谈,当协作bean被注入到依赖bean时,协作bean必须在依赖bean之前完全配置好。例如bean A对bean B存在依赖关系,那么Spring IoC容器在调用bean A的setter方法之前,bean B必须被完全配置,这里所谓完全配置的意思就是bean将被实例化(如果不是采用提前实例化的singleton模式),相关的依赖也将被设置好,而且所有相关的lifecycle方法(如IntializingBean的init方法以及callback方法)也将被调用。
首先是一个用XML格式定义的Setter DI例子。相关的XML配置如下:
<bean id="exampleBean" class="examples.ExampleBean">

  <!-- setter injection using the nested <ref/> element -->
  <property name="beanOne"><ref bean="anotherExampleBean"/></property>

  <!-- setter injection using the neater 'ref' attribute -->
  <property name="beanTwo" ref="yetAnotherBean"/>
  <property name="integerProperty" value="1"/>
</bean>

<bean id="anotherExampleBean" class="examples.AnotherBean"/>
<bean id="yetAnotherBean" class="examples.YetAnotherBean"/>
public class ExampleBean {

    private AnotherBean beanOne;
    private YetAnotherBean beanTwo;
    private int i;

    public void setBeanOne(AnotherBean beanOne) {
        this.beanOne = beanOne;
    }

    public void setBeanTwo(YetAnotherBean beanTwo) {
        this.beanTwo = beanTwo;
    }

    public void setIntegerProperty(int i) {
        this.i = i;
    }
}
正如你所看到的,bean类中的setter方法与xml文件中配置的属性是一一对应的。接着是构造器注入的例子:
<bean id="exampleBean" class="examples.ExampleBean">

  <!-- constructor injection using the nested <ref/> element -->
  <constructor-arg>
    <ref bean="anotherExampleBean"/>
  </constructor-arg>

  <!-- constructor injection using the neater 'ref' attribute -->
  <constructor-arg ref="yetAnotherBean"/>

  <constructor-arg type="int" value="1"/>
</bean>

<bean id="anotherExampleBean" class="examples.AnotherBean"/>
<bean id="yetAnotherBean" class="examples.YetAnotherBean"/>
public class ExampleBean {

    private AnotherBean beanOne;
    private YetAnotherBean beanTwo;
    private int i;

    public ExampleBean(
        AnotherBean anotherBean, YetAnotherBean yetAnotherBean, int i) {
        this.beanOne = anotherBean;
        this.beanTwo = yetAnotherBean;
        this.i = i;
    }
}
如你所见,在xml bean定义中指定的构造器参数将被用来作为传递给类ExampleBean构造器的参数。
现在来研究一个替代构造器的方法,采用static工厂方法返回对象实例:
<bean id="exampleBean" class="examples.ExampleBean"
      factory-method="createInstance">
  <constructor-arg ref="anotherExampleBean"/>
  <constructor-arg ref="yetAnotherBean"/>
  <constructor-arg value="1"/>
</bean>

<bean id="anotherExampleBean" class="examples.AnotherBean"/>
<bean id="yetAnotherBean" class="examples.YetAnotherBean"/>
public class ExampleBean {
// a private constructor
private ExampleBean(...) {
...
}
// a static factory method; the arguments to this method can be
// considered the dependencies of the bean that is returned,
// regardless of how those arguments are actually used.
public static ExampleBean createInstance (
AnotherBean anotherBean, YetAnotherBean yetAnotherBean, int i) {
ExampleBean eb = new ExampleBean (...);
// some other operations...
return eb;
}
}请注意,传给static工厂方法的参数由constructor-arg元素提供,这与使用构造器注入时完全一样。而且,重要的是,工厂方法所返回的实例的类型并不一定要与包含static工厂方法的类类型一致。尽管在此例子中它的确是这样。非静态的实例工厂方法与此相同(除了使用factory-bean属性替代class属性外),因而不在此细述。
正如前面章节所提到的,bean的属性及构造器参数既可以引用容器中的其他bean,也可以是内联(inline)bean。在spring的XML配置中使用<property/>和<constructor-arg/>元素定义。
<value/>元素通过人可以理解的字符串来指定属性或构造器参数的值。正如前面所提到的,JavaBean PropertyEditor将用于把字符串从java.lang.String类型转化为实际的属性或参数类型。
<bean id="myDataSource" class="org.apache.commons.dbcp.BasicDataSource" destroy-method="close">

  <!-- results in a setDriverClassName(String) call -->
  <property name="driverClassName">
    <value>com.mysql.jdbc.Driver</value>
  </property>
  <property name="url">
    <value>jdbc:mysql://localhost:3306/mydb</value>
  </property>
  <property name="username">
    <value>root</value>
  </property>
  <property name="password">
    <value>masterkaoli</value>
  </property>
</bean>
<property/> 和<constructor-arg/> 元素中也可以使用'value' 属性,这样会使我们的配置更简洁,比如下面的配置:
<bean id="myDataSource" class="org.apache.commons.dbcp.BasicDataSource" destroy-method="close">

  <!-- results in a setDriverClassName(String) call -->
  <property name="driverClassName" value="com.mysql.jdbc.Driver"/>
  <property name="url" value="jdbc:mysql://localhost:3306/mydb"/>
  <property name="username" value="root"/>
  <property name="password" value="masterkaoli"/>
</bean>Spring团队更倾向采用属性方式(使用<value/>元素)来定义value值。当然我们也可以按照下面这种方式配置一个java.util.Properties实例:
<bean id="mappings" class="org.springframework.beans.factory.config.PropertyPlaceholderConfigurer">

   <!-- typed as a java.util.Properties -->
   <property name="properties">
      <value>
         jdbc.driver.className=com.mysql.jdbc.Driver
         jdbc.url=jdbc:mysql://localhost:3306/mydb
      </value>
   </property>
</bean>
看到什么了吗?如果采用上面的配置,Spring容器将使用JavaBean PropertyEditor把<value/>元素中的文本转换为一个java.util.Properties实例。由于这种做法的简单,因此Spring团队在很多地方也会采用内嵌的<value/>元素来代替value属性。
idref元素用来将容器内其它bean的id传给<constructor-arg/> 或 <property/>元素,同时提供错误验证功能。
<bean id="theTargetBean" class="..."/>

<bean id="theClientBean" class="...">
    <property name="targetName">
        <idref bean="theTargetBean" />
    </property>
</bean>上述bean定义片段完全地等同于(在运行时)以下的片段:
<bean id="theTargetBean" class="..." />

<bean id="client" class="...">
    <property name="targetName" value="theTargetBean" />
</bean>第一种形式比第二种更可取的主要原因是,使用idref标记允许容器在部署时 验证所被引用的bean是否存在。而第二种方式中,传给client bean的targetName属性值并没有被验证。任何的输入错误仅在client bean实际实例化时才会被发现(可能伴随着致命的错误)。如果client bean 是prototype类型的bean,则此输入错误(及由此导致的异常)可能在容器部署很久以后才会被发现。
此外,如果被引用的bean在同一XML文件内,且bean名字就是bean id,那么可以使用local属性,此属性允许XML解析器在解析XML文件时对引用的bean进行验证。
<property name="targetName">
   <!-- a bean with an id of 'theTargetBean' must exist; otherwise an XML exception will be thrown -->
   <idref local="theTargetBean"/>
</property>上面的例子中,与在ProxyFactoryBean bean定义中使用<idref/>元素指定AOP interceptor的相同之处在于:如果使用<idref/>元素指定拦截器名字,可以避免因一时疏忽导致的拦截器ID拼写错误。
在<constructor-arg/>或<property/>元素内部还可以使用ref元素。该元素用来将bean中指定属性的值设置为对容器中的另外一个bean的引用。如前所述,该引用bean将被作为依赖注入,而且在注入之前会被初始化(如果是singleton bean则已被容器初始化)。尽管都是对另外一个对象的引用,但是通过id/name指向另外一个对象却有三种不同的形式,不同的形式将决定如何处理作用域及验证。
第一种形式也是最常见的形式是通过使用<ref/>标记指定bean属性的目标bean,通过该标签可以引用同一容器或父容器内的任何bean(无论是否在同一XML文件中)。XML 'bean'元素的值既可以是指定bean的id值也可以是其name值。
<ref bean="someBean"/>
第二种形式是使用ref的local属性指定目标bean,它可以利用XML解析器来验证所引用的bean是否存在同一文件中。local属性值必须是目标bean的id属性值。如果在同一配置文件中没有找到引用的bean,XML解析器将抛出一个例外。如果目标bean是在同一文件内,使用local方式就是最好的选择(为了尽早地发现错误)。
<ref local="someBean"/>
第三种方式是通过使用ref的parent属性来引用当前容器的父容器中的bean。parent属性值既可以是目标bean的id值,也可以是name属性值。而且目标bean必须在当前容器的父容器中。使用parent属性的主要用途是为了用某个与父容器中的bean同名的代理来包装父容器中的一个bean(例如,子上下文中的一个bean定义覆盖了他的父bean)。
<!-- in the parent context -->
<bean id="accountService" class="com.foo.SimpleAccountService">
    <!-- insert dependencies as required as here -->
</bean>
<!-- in the child (descendant) context -->
<bean id="accountService"  <-- notice that the name of this bean is the same as the name of the 'parent' bean
      class="org.springframework.aop.framework.ProxyFactoryBean">
      <property name="target">
          <ref parent="accountService"/>  <-- notice how we refer to the parent bean
      </property>
    <!-- insert other configuration and dependencies as required as here -->
</bean>
所谓的内部bean(inner bean)是指在一个bean的<property/>或 <constructor-arg/>元素中使用<bean/>元素定义的bean。内部bean定义不需要有id或name属性,即使指定id 或 name属性值也将会被容器忽略。
<bean id="outer" class="...">
  <!-- instead of using a reference to a target bean, simply define the target bean inline -->
  <property name="target">
    <bean class="com.example.Person"> <!-- this is the inner bean -->
      <property name="name" value="Fiona Apple"/>
      <property name="age" value="25"/>
    </bean>
  </property>
</bean>
注意:内部bean中的scope标记及id或name属性将被忽略。内部bean总是匿名的且它们总是prototype模式的。同时将内部bean注入到包含该内部bean之外的bean是不可能的。
通过<list/>、<set/>、<map/>及<props/>元素可以定义和设置与Java Collection类型对应List、Set、Map及Properties的值。
<bean id="moreComplexObject" class="example.ComplexObject">
  <!-- results in a setAdminEmails(java.util.Properties) call -->
  <property name="adminEmails">
    <props>
        <prop key="administrator">administrator@example.org</prop>
        <prop key="support">support@example.org</prop>
        <prop key="development">development@example.org</prop>
    </props>
  </property>
  <!-- results in a setSomeList(java.util.List) call -->
  <property name="someList">
    <list>
        <value>a list element followed by a reference</value>
        <ref bean="myDataSource" />
    </list>
  </property>
  <!-- results in a setSomeMap(java.util.Map) call -->
  <property name="someMap">
    <map>
        <entry>
            <key>
                <value>an entry</value>
            </key>
            <value>just some string</value>
        </entry>
        <entry>
            <key>
                <value>a ref</value>
            </key>
            <ref bean="myDataSource" />
        </entry>
    </map>
  </property>
  <!-- results in a setSomeSet(java.util.Set) call -->
  <property name="someSet">
    <set>
        <value>just some string</value>
        <ref bean="myDataSource" />
    </set>
  </property>
</bean>
注意:map的key或value值,或set的value值还可以是以下元素:
bean | ref | idref | list | set | map | props | value | null
从2.0开始,Spring IoC容器将支持集合的合并。这样我们可以定义parent-style和child-style的<list/>、<map/>、<set/>或<props/>元素,子集合的值从其父集合继承和覆盖而来;也就是说,父子集合元素合并后的值就是子集合中的最终结果,而且子集合中的元素值将覆盖父集全中对应的值。
请注意,关于合并的这部分利用了parent-child bean机制。此内容将在后面介绍,不熟悉父子bean的读者可参见Section 3.6, “bean定义的继承”。
Find below an example of the collection merging feature:
下面的例子展示了集合合并特性:
<beans>
<bean id="parent" abstract="true" class="example.ComplexObject">
    <property name="adminEmails">
        <props>
            <prop key="administrator">administrator@example.com</prop>
            <prop key="support">support@example.com</prop>
        </props>
    </property>
</bean>
<bean id="child" parent="parent">
    <property name="adminEmails">
        <!-- the merge is specified on the *child* collection definition -->
        <props merge="true">
            <prop key="sales">sales@example.com</prop>
            <prop key="support">support@example.co.uk</prop>
        </props>
    </property>
</bean>
<beans>在上面的例子中,childbean的adminEmails属性的<props/>元素上使用了merge=true属性。当child bean被容器实际解析及实例化时,其 adminEmails将与父集合的adminEmails属性进行合并。
administrator=administrator@example.com
sales=sales@example.com
support=support@example.co.uk
注意到这里子bean的Properties集合将从父<props/>继承所有属性元素。同时子bean的support值将覆盖父集合的相应值。
对于<list/>、<map/>及<set/>集合类型的合并处理都基本类似,在某个方面<list/>元素比较特殊,这涉及到List集合本身的语义学,就拿维护一个有序集合中的值来说,父bean的列表内容将排在子bean列表内容的前面。对于Map、Set及Properties集合类型没有顺序的概念,因此作为相关的Map、Set及Properties实现基础的集合类型在容器内部没有排序的语义。
最后需要指出的一点就是,合并功能仅在Spring 2.0(及随后的版本中)可用。不同的集合类型是不能合并(如map和 list是不能合并的),否则将会抛出相应的Exception。merge属性必须在继承的子bean中定义,而在父bean的集合属性上指定的merge属性将被忽略。
你若有幸在使用Java5 或Java 6,那么你可以使用强类型集合(支持泛型)。比如,声明一个只能包含String类型元素的Collection。假若使用Spring来给bean注入强类型的Collection,那就可以利用Spring的类型转换能,当向强类型Collection中添加元素前,这些元素将被转换。
public class Foo {

    private Map<String, Float> accounts;

    public void setAccounts(Map<String, Float> accounts) {
        this.accounts = accounts;
    }
}
<beans>
<bean id="foo" class="x.y.Foo">
<property name="accounts">
<map>
<entry key="one" value="9.99"/>
<entry key="two" value="2.75"/>
<entry key="six" value="3.99"/>
</map>
</property>
</bean>
</beans>在foobean的accounts属性被注入之前,通过反射,利用强类型Map<String, Float>的泛型信息,Spring的底层类型转换机制将会把各种value元素值转换为Float类型,因此字符串9.99、2.75及3.99就会被转换为实际的Float类型。
<null/>用于处理null值。Spring会把属性的空参数当作空字符串处理。以下的xml片断将email属性设为空字符串。
<bean class="ExampleBean">
  <property name="email"><value/></property>
</bean>
这等同于Java代码: exampleBean.setEmail("")。 而null值则可以使用<null>元素可用来表示。例如:
<bean class="ExampleBean">
  <property name="email"><null/></property>
</bean>
上述的配置等同于Java代码:exampleBean.setEmail(null)。
配置元数据冗长不是什么好事情,因此我们将通过下面的方式来对配置进行“减肥”,第一种做法就是通过使用<property/>来定义值和对其他bean的引用,另一个做法就是采用不同的属性定义格式。
<property/>、<constructor-arg/>及<entry/>元素都支持value属性(attribute),它可以用来替代内嵌的<value/>元素。因而,以下的代码:
<property name="myProperty">
  <value>hello</value>
</property>
<constructor-arg>
  <value>hello</value>
</constructor-arg>
<entry key="myKey">
  <value>hello</value>
</entry>
等同于:
<property name="myProperty" value="hello"/>
<constructor-arg value="hello"/>
<entry key="myKey" value="hello"/>
The <property/> and <constructor-arg/> elements support a similar shortcut 'ref' attribute which may be used instead of a full nested <ref/> element. Therefore, the following:
<property/>和<constructor-arg/>支持类似ref的简写属性,它可用来替代整个内嵌的<ref/>元素。因而,以下的代码:
<property name="myProperty">
  <ref bean="myBean">
</property>
<constructor-arg>
  <ref bean="myBean">
</constructor-arg>
等同于:
<property name="myProperty" ref="myBean"/>
<constructor-arg ref="myBean"/>
注意,尽管存在等同于<ref bean="xxx"> 元素的简写形式,但并没有<ref local="xxx">的简写形式,为了对当前xml中bean的引用,你只能使用完整的形式。
最后,map中entry元素的简写形式为key/key-ref 和 value /value-ref属性,因而,以下的代码:
<entry>
  <key>
    <ref bean="myKeyBean" />
  </key>
  <ref bean="myValueBean" />
</entry>
等同于:
<entry key-ref="myKeyBean" value-ref="myValueBean"/>
再次强调,只有<ref bean="xxx">元素的简写形式,没有<ref local="xxx">的简写形式。
给XML配置文件"减肥"的另一个选择就是使用p名称空间,从 2.0开始,Spring支持使用名称空间的可扩展配置格式。这些名称空间都是基于一种XML Schema定义。事实上,我们所看到的所有bean的配置格式都是基于一个 XML Schema文档。
特定的名称空间并不需要定义在一个XSD文件中,它只在Spring内核中存在。我们所说的p名称空间就是这样,它不需要一个schema定义,与我们前面采用<property/>元素定义bean的属性不同的是,当我们采用了p名称空间,我们就可以在bean元素中使用属性(attribute)来描述bean的property值。
下面的两段XML配置文件中都是用来定义同一个bean:一个采用的是标准的XML格式,一个是采用p名称空间。
<beans xmlns="http://www.springframework.org/schema/beans"
    xmlns:xsi="http://www.w3.org/2001/XMLSchema-instance"
    xmlns:p="http://www.springframework.org/schema/p"
    xsi:schemaLocation="http://www.springframework.org/schema/beans
        http://www.springframework.org/schema/beans/spring-beans-2.5.xsd">

    <bean name="classic" class="com.example.ExampleBean">
        <property name="email" value="foo@bar.com/>
    </bean>

    <bean name="p-namespace" class="com.example.ExampleBean"
          p:email="foo@bar.com"/>
</beans>
从上面的bean定义中,我们采用p名称空间的方式包含了一个叫email的属性,而Spring会知道我们的bean包含了一个属性(property)定义。我们前面说了,p名称空间是不需要schema定义的,因此属性(attribute)的名字就是你bean的property的名字。
This next example includes two more bean definitions that both have a reference to another bean:
下面的例子包含了两个bean定义,它们都引用了另一个bean
<beans xmlns="http://www.springframework.org/schema/beans"
    xmlns:xsi="http://www.w3.org/2001/XMLSchema-instance"
    xmlns:p="http://www.springframework.org/schema/p"
    xsi:schemaLocation="http://www.springframework.org/schema/beans
        http://www.springframework.org/schema/beans/spring-beans-2.5.xsd">

    <bean name="john-classic" class="com.example.Person">
        <property name="name" value="John Doe"/>
        <property name="spouse" ref="jane"/>
    </bean>

    <bean name="john-modern"
        class="com.example.Person"
        p:name="John Doe"
        p:spouse-ref="jane"/>

    <bean name="jane" class="com.example.Person">
        <property name="name" value="Jane Doe"/>
    </bean>
</beans>
As you can see, this example doesn't only include a property value using the p-namespace, but also uses a special format to declare property references. Whereas the first bean definition uses <property name="spouse" ref="jane"/> to create a reference from bean john to bean jane, the second bean definition uses p:spouse-ref="jane" as an attribute to do the exact same thing. In this case 'spouse' is the property name whereas the '-ref' part indicates that this is not a straight value but rather a reference to another bean.
上面的例子不仅使用p名称空间包含了一个属性(property)值,而且使用了一个特殊的格式声明了一个属性引用。在第一个bean定义中使用了<property name="spouse" ref="jane"/>来建立beanjohn到beanjane的引用,而第二个bean定义则采用p:spouse-ref="jane"属性(attribute)的方式达到了同样的目的。在这个例子中,"spouse"是属性(property)名,而"-ref“则用来说明该属性不是一个具体的值而是对另外一个bean的引用。
| Note |
|---|---|
需要注意的是,p名称空间没有标准的XML格式定义灵活,比如说,bean的属性名是以Ref结尾的,那么采用p名称空间定义就会导致冲突,而采用标准的XML格式定义则不会出现这种问题。这里我们提醒大家在项目中还是仔细权衡来决定到底采用那种方式,同时也可以在团队成员都理解不同的定义方式的基础上,在项目中根据需要同时选择三种定义方式。 | |
当设置bean的组合属性时,除了最后一个属性外,只要其他属性值不为null,组合或嵌套属性名是完全合法的。例如,下面bean的定义:
<bean id="foo" class="foo.Bar">
  <property name="fred.bob.sammy" value="123" />
</bean>
foo bean有个fred属性,此属性有个bob属性,而bob属性又有个sammy属性,最后把sammy属性设置为123。为了让此定义能工作, foo的fred属性及fred的bob属性在bean被构造后都必须非空,否则将抛出NullPointerException异常。
多数情况下,一个bean对另一个bean的依赖最简单的做法就是将一个bean设置为另外一个bean的属性。在xml配置文件中最常见的就是使用 <ref/>元素。在少数情况下,有时候bean之间的依赖关系并不是那么的直接(例如,当类中的静态块的初始化被时,如数据库驱动的注册)。depends-on属性可以用于当前bean初始化之前显式地强制一个或多个bean被初始化。下面的例子中使用了depends-on属性来指定一个bean的依赖。
<bean id="beanOne" class="ExampleBean" depends-on="manager"/>

<bean id="manager" class="ManagerBean" />
若需要表达对多个bean的依赖,可以在'depends-on'中将指定的多个bean名字用分隔符进行分隔,分隔符可以是逗号、空格及分号等。下面的例子中使用了'depends-on'来表达对多个bean的依赖。
<bean id="beanOne" class="ExampleBean" depends-on="manager,accountDao">
  <property name="manager" ref="manager" />
</bean>

<bean id="manager" class="ManagerBean" />
<bean id="accountDao" class="x.y.jdbc.JdbcAccountDao" />
| Note |
|---|---|
“depends-on”属性不仅用来指定初始化时的依赖,同时也用来指定相应的销毁时的依赖(该依赖只针对singletonbean)。depends-on属性中指定的依赖bean会在相关bean销毁之前被销毁,从而可以让用户控制销毁顺序。 | |
ApplicationContext实现的默认行为就是在启动时将所有singleton bean提前进行实例化。提前实例化意味着作为初始化过程的一部分,ApplicationContext实例会创建并配置所有的singleton bean。通常情况下这是件好事,因为这样在配置中的任何错误就会即刻被发现(否则的话可能要花几个小时甚至几天)。
有时候这种默认处理可能并不是你想要的。如果你不想让一个singleton bean在ApplicationContext初始化时被提前实例化,那么可以将bean设置为延迟实例化。一个延迟初始化bean将告诉IoC 容器是在启动时还是在第一次被用到时实例化。
在XML配置文件中,延迟初始化将通过<bean/>元素中的lazy-init属性来进行控制。例如:
<bean id="lazy" class="com.foo.ExpensiveToCreateBean" lazy-init="true"/>

<bean name="not.lazy" class="com.foo.AnotherBean"/>当ApplicationContext实现加载上述配置时,设置为lazy的bean将不会在ApplicationContext启动时提前被实例化,而not.lazy却会被提前实例化。
需要说明的是,如果一个bean被设置为延迟初始化,而另一个非延迟初始化的singleton bean依赖于它,那么当ApplicationContext提前实例化singleton bean时,它必须也确保所有上述singleton 依赖bean也被预先初始化,当然也包括设置为延迟实例化的bean。因此,如果Ioc容器在启动的时候创建了那些设置为延迟实例化的bean的实例,你也不要觉得奇怪,因为那些延迟初始化的bean可能在配置的某个地方被注入到了一个非延迟初始化singleton bean里面。
在容器层次上通过在<beans/>元素上使用'default-lazy-init'属性来控制延迟初始化也是可能的。如下面的配置:
<beans default-lazy-init="true">
    <!-- no beans will be pre-instantiated... -->
</beans>Spring IoC容器可以自动装配(autowire)相互协作bean之间的关联关系。因此,如果可能的话,可以自动让Spring通过检查BeanFactory中的内容,来替我们指定bean的协作者(其他被依赖的bean)。autowire一共有五种类型。由于autowire可以针对单个bean进行设置,因此可以让有些bean使用autowire,有些bean不采用。autowire的方便之处在减少或者消除属性或构造器参数的设置,这样可以给我们的配置文件减减肥![2] 在xml配置文件中,可以在<bean/>元素中使用autowire属性指定:
Table 3.2. Autowiring modes
| 模式 | 说明 |
|---|---|
| no | |
| byName | 根据属性名自动装配。此选项将检查容器并根据名字查找与属性完全一致的bean,并将其与属性自动装配。例如,在bean定义中将autowire设置为by name,而该bean包含master属性(同时提供setMaster(..)方法),Spring就会查找名为master的bean定义,并用它来装配给master属性。 |
| byType | 如果容器中存在一个与指定属性类型相同的bean,那么将与该属性自动装配。如果存在多个该类型的bean,那么将会抛出异常,并指出不能使用byType方式进行自动装配。若没有找到相匹配的bean,则什么事都不发生,属性也不会被设置。如果你不希望这样,那么可以通过设置dependency-check="objects"让Spring抛出异常。 |
| constructor | 与byType的方式类似,不同之处在于它应用于构造器参数。如果在容器中没有找到与构造器参数类型一致的bean,那么将会抛出异常。 |
| autodetect | 通过bean类的自省机制(introspection)来决定是使用constructor还是byType方式进行自动装配。如果发现默认的构造器,那么将使用byType方式。 |
如果直接使用property和constructor-arg注入依赖的话,那么将总是覆盖自动装配。而且目前也不支持简单类型的自动装配,这里所说的简单类型包括基本类型、String、Class以及简单类型的数组(这一点已经被设计,将考虑作为一个功能提供)。byType和constructor自动装配模式也可用于数组和指定类型的集合。在这种情况下容器中的所有匹配的自动装配对象将被用于满足各种依赖。对于key值类型为 String的强类型Map也可以被自动装配。一个自动装配的Map的value值将由所匹配类型的bean所填充。而Map的key值则是相应的bean的名字。
自动装配还可以与依赖检查结合使用,这样依赖检查将在自动装配完成之后被执行。
理解自动装配的优缺点是很重要的。其中优点包括:
自动装配能显著减少配置的数量。不过,采用bean模板(见这里)也可以达到同样的目的。
自动装配可以使配置与java代码同步更新。例如,如果你需要给一个java类增加一个依赖,那么该依赖将被自动实现而不需要修改配置。因此强烈推荐在开发过程中采用自动装配,而在系统趋于稳定的时候改为显式装配的方式。
自动装配的一些缺点:
尽管自动装配比显式装配更神奇,但是,正如上面所提到的,Spring会尽量避免在装配不明确的时候进行猜测,因为装配不明确可能出现难以预料的结果,而且Spring所管理的对象之间的关联关系也不再能清晰的进行文档化。
对于那些根据Spring配置文件生成文档的工具来说,自动装配将会使这些工具没法生成依赖信息。
另一个问题需要注意的是,当根据类型进行自动装配的时候,容器中可能存在多个bean定义跟自动装配的setter方法和构造器参数类型匹配。虽然对于数组、集合以及Map,不存在这个问题,但是对于单值依赖来说,就会存在模棱两可的问题。如果bean定义不唯一,装配时就会抛出异常,面对这种场景我们有几个方案进行选择:第一个方案就是弃自动装配而改用显式装配;第二个方案就是在bean定义中通过设置'autowire-candidate'属性为'false'来将该bean排除在自动装配候选名单之外(详情见接下来的章节);第三个方案是通过在bean定义中设置'primary'属性为'true'来将该bean设置为首选自动装配bean。最后,对于使用Java 5的用户来说,可能会使用注解的形式来配置bean,关于这方面的内容可见Section 3.11, “基于注解(Annotation-based)的配置”。
但决定是否使用自动装配式时,没有绝对的对错。考虑项目的实际是最好的办法。比如项目通常不使用自动装配,那么使用它来仅仅装配2个bean定义是很让人困惑的。
你也可以针对单个bean设置其是否为被自动装配对象。当采用XML格式配置bean时,<bean/>元素的 autowire-candidate属性可被设为false,这样容器在查找自动装配对象时将不考虑该bean。
另一个做法就是使用对bean名字进行模式匹配来对自动装配进行限制。其做法是在<beans/>元素的'default-autowire-candidates'属性中进行设置。比如,将自动装配限制在名字以'Repository'结尾的bean,那么可以设置为"*Repository“。对于多个匹配模式则可以使用逗号进行分隔。注意,如果在bean定义中的'autowire-candidate'属性显式的设置为'true' 或 'false',那么该容器在自动装配的时候优先采用该属性的设置,而模式匹配将不起作用。
对于那些从来就不会被其它bean采用自动装配的方式来注入的bean而言,这是有用的。不过这并不意味着被排除的bean自己就不能使用自动装配来注入其他bean,它是可以的,或者更准确地说,应该是它不会被考虑作为其他bean自动装配的候选者。
Spring除了能对容器中bean的依赖设置进行检查外,还可以检查bean定义中实际属性值的设置,当然也包括采用自动装配方式设置属性值的检查。
当需要确保bean的所有属性值(或者属性类型)被正确设置的时候,那么这个功能会非常有用。当然,在很多情况下,bean类的某些属性会具有默认值,或者有些属性并不会在所有场景下使用,因此这项功能会存在一定的局限性。就像自动装配一样,依赖检查也可以针对每一个bean进行设置。依赖检查默认为not,它有几种不同的使用模式,在xml配置文件中,可以在bean定义中为dependency-check属性使用以下几种值:
Table 3.3. 依赖检查方式
| 模式 | 说明 |
|---|---|
| none | 没有依赖检查,如果bean的属性没有值的话可以不用设置。 |
| simple | 对于原始类型及集合(除协作者外的一切东西)执行依赖检查 |
| object | 仅对协作者执行依赖检查 |
| all | 对协作者,原始类型及集合执行依赖检查 |
假若你在使用Java 5,可以采用源代码级的注解(annotations)来进行配置,关于这方面的内容可以在Section 25.3.1, “@Required”这一节找到。
在大部分情况下,容器中的bean都是singleton类型的。如果一个singleton bean要引用另外一个singleton bean,或者一个非singleton bean要引用另外一个非singleton bean时,通常情况下将一个bean定义为另一个bean的property值就可以了。不过对于具有不同生命周期的bean来说这样做就会有问题了,比如在调用一个singleton类型bean A的某个方法时,需要引用另一个非singleton(prototype)类型的bean B,对于bean A来说,容器只会创建一次,这样就没法在需要的时候每次让容器为bean A提供一个新的的bean B实例。
上述问题的一个解决办法就是放弃控制反转。通过实现BeanFactoryAware接口(见这里)让bean A能够感知bean 容器,并且在需要的时候通过使用getBean("B")方式(见这里)向容器请求一个新的bean B实例。看下下面这个例子,其中故意使用了这种方法:
// a class that uses a stateful Command-style class to perform some processing
package fiona.apple;

// lots of Spring-API imports
import org.springframework.beans.BeansException;
import org.springframework.beans.factory.BeanFactory;
import org.springframework.beans.factory.BeanFactoryAware;

public class CommandManager implements BeanFactoryAware {

   private BeanFactory beanFactory;

   public Object process(Map commandState) {
      // grab a new instance of the appropriate Command
      Command command = createCommand();
      // set the state on the (hopefully brand new) Command instance
      command.setState(commandState);
      return command.execute();
   }

   // the Command returned here could be an implementation that executes asynchronously, or whatever
   protected Command createCommand() {
      return (Command) this.beanFactory.getBean("command"); // notice the Spring API dependency
   }

   public void setBeanFactory(BeanFactory beanFactory) throws BeansException {
      this.beanFactory = beanFactory;
   }
}
上面的例子显然不是最好的,因为业务代码和Spring Framework产生了耦合。方法注入,作为Spring IoC容器的一种高级特性,可以以一种干净的方法来处理这种情况。
Lookup方法注入利用了容器的覆盖受容器管理的bean方法的能力,从而返回指定名字的bean实例。在上述场景中,Lookup方法注入适用于原型bean。Lookup方法注入的内部机制是Spring利用了CGLIB库在运行时生成二进制代码功能,通过动态创建Lookup方法bean的子类而达到复写Lookup方法的目的。
如果你看下上个代码段中的代码(CommandManager类),Spring容器动态覆盖了createCommand()方法的实现。你的CommandManager类不会有一点对Spring的依赖,在下面这个例子中也是一样的:
package fiona.apple;

// no more Spring imports!

public abstract class CommandManager {

   public Object process(Object commandState) {
      // grab a new instance of the appropriate Command interface
      Command command = createCommand();
      // set the state on the (hopefully brand new) Command instance
      command.setState(commandState);
      return command.execute();
   }

    // okay... but where is the implementation of this method?
   protected abstract Command createCommand();
}
在包含被注入方法的客户类中(此处是CommandManager),此方法的定义必须按以下形式进行:
<public|protected> [abstract] <return-type> theMethodName(no-arguments);如果方法是抽象的,动态生成的子类会实现该方法。否则,动态生成的子类会覆盖类里的具体方法。让我们来看个例子:
<!-- a stateful bean deployed as a prototype (non-singleton) -->
<bean id="command" class="fiona.apple.AsyncCommand" scope="prototype">
  <!-- inject dependencies here as required -->
</bean>

<!-- commandProcessor uses statefulCommandHelper -->
<bean id="commandManager" class="fiona.apple.CommandManager">
  <lookup-method name="createCommand" bean="command"/>
</bean>
在上面的例子中,标识为commandManager的bean在需要一个新的command bean实例时,会调用createCommand方法。重要的一点是,必须将command部署为prototype。当然也可以指定为singleton,如果是这样的话,那么每次将返回相同的command bean实例!
请注意,为了让这个动态子类得以正常工作,需要把CGLIB的jar文件放在classpath里。另外,Spring容器要子类化的类不能是final的,要覆盖的方法也不能是final的。同样的,要测试一个包含抽象方法的类也稍微有些不同,你需要自己编写它的子类提供该抽象方法的桩实现。最后,作为方法注入目标的bean不能是序列化的(serialized)。
![[Tip]](../images/admons/tip.png) | Tip |
|---|---|
有兴趣的读者也许已经发现ServiceLocatorFactoryBean(在org.springframework.beans.factory.config包里)的用法和ObjectFactoryCreatingFactoryBean的有些相似,不同的是它允许你指定自己的lookup接口,不一定非要用Spring的lookup接口,比如ObjectFactory。要详细了解这种方法请参考ServiceLocatorFactoryBean的Javadocs(它的确减少了对Spring的耦合)。 | |
比起Lookup 方法注入来,还有一种很少用到的方法注入形式,该注入能使用bean的另一个方法实现去替换自定义的方法。除非你真的需要该功能,否则可以略过本节。
当使用基于XML配置元数据文件时,可以在bean定义中使用replaced-method元素来达到用另一个方法来取代已有方法的目的。考虑下面的类,我们将覆盖computeValue方法:
public class MyValueCalculator {

  public String computeValue(String input) {
    // some real code...
  }

  // some other methods...

}实现org.springframework.beans.factory.support.MethodReplacer接口的类提供了新的方法定义。
/** meant to be used to override the existing computeValue(String)
    implementation in MyValueCalculator
  */
public class ReplacementComputeValue implements MethodReplacer {

    public Object reimplement(Object o, Method m, Object[] args) throws Throwable {
        // get the input value, work with it, and return a computed result
        String input = (String) args[0];
        ...
        return ...;
    }
}
下面的bean定义中指定了要配置的原始类和将要覆写的方法:
<bean id="myValueCalculator class="x.y.z.MyValueCalculator">
  <!-- arbitrary method replacement -->
  <replaced-method name="computeValue" replacer="replacementComputeValue">
    <arg-type>String</arg-type>
  </replaced-method>
</bean>

<bean id="replacementComputeValue" class="a.b.c.ReplacementComputeValue"/>在<replaced-method/>元素内可包含一个或多个<arg-type/>元素,这些元素用来标明被覆写的方法签名。只有被覆写(override)的方法存在重载(overload)的情况(同名的多个方法变体)才会使用方法签名。为了方便,参数的类型字符串可以采用全限定类名的简写。例如,下面的字符串都表示参数类型为java.lang.String。
    java.lang.String
    String
    Str
参数的个数通常足够用来区别每个可能的选择,这个捷径能减少很多键盘输入的工作,它允许你只输入最短的匹配参数类型的字符串。
创建一个bean定义,其实质是用该bean定义对应的类来创建真正实例的“配方(recipe)”。把bean定义看成一个配方很有意义,它与class很类似,只根据一张“处方”就可以创建多个实例。
你不仅可以控制注入到对象中的各种依赖和配置值,还可以控制该对象的作用域。这样你可以灵活选择所建对象的作用域,而不必在Java Class级定义作用域。Spring Framework支持五种作用域(其中有三种只能用在基于web的Spring ApplicationContext)。
内置支持的作用域分列如下:
Table 3.4. Bean作用域
| 作用域 | 描述 |
|---|---|
在每个Spring IoC容器中一个bean定义对应一个对象实例。 | |
一个bean定义对应多个对象实例。 | |
在一次HTTP请求中,一个bean定义对应一个实例;即每次HTTP请求将会有各自的bean实例, 它们依据某个bean定义创建而成。该作用域仅在基于web的Spring ApplicationContext情形下有效。 | |
在一个HTTP Session中,一个bean定义对应一个实例。该作用域仅在基于web的Spring ApplicationContext情形下有效。 | |
在一个全局的HTTP Session中,一个bean定义对应一个实例。典型情况下,仅在使用portlet context的时候有效。该作用域仅在基于web的Spring ApplicationContext情形下有效。 |
当一个bean的作用域为singleton, 那么Spring IoC容器中只会存在一个共享的bean实例,并且所有对bean的请求,只要id与该bean定义相匹配,则只会返回bean的同一实例。
换言之,当把一个bean定义设置为singlton作用域时,Spring IoC容器只会创建该bean定义的唯一实例。这个单一实例会被存储到单例缓存(singleton cache)中,并且所有针对该bean的后续请求和引用都将返回被缓存的对象实例。

请注意Spring的singleton bean概念与“四人帮”(GoF)模式一书中定义的Singleton模式是完全不同的。经典的GoF Singleton模式中所谓的对象范围是指在每一个ClassLoader中指定class创建的实例有且仅有一个。把Spring的singleton作用域描述成一个container对应一个bean实例最为贴切。亦即,假如在单个Spring容器内定义了某个指定class的bean,那么Spring容器将会创建一个且仅有一个由该bean定义指定的类实例。Singleton作用域是Spring中的缺省作用域。要在XML中将bean定义成singleton,可以这样配置:
<bean id="accountService" class="com.foo.DefaultAccountService"/>

<!-- the following is equivalent, though redundant (singleton scope is the default); using spring-beans-2.0.dtd -->
<bean id="accountService" class="com.foo.DefaultAccountService" scope="singleton"/>

<!-- the following is equivalent and preserved for backward compatibility in spring-beans.dtd -->
<bean id="accountService" class="com.foo.DefaultAccountService" singleton="true"/>
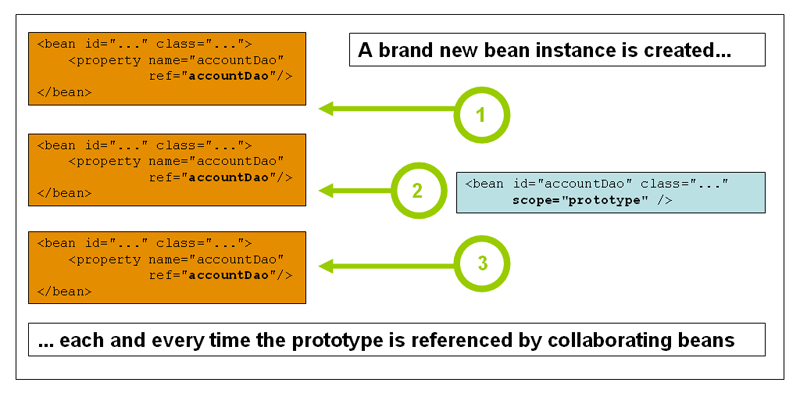
Prototype作用域的bean会导致在每次对该bean请求(将其注入到另一个bean中,或者以程序的方式调用容器的getBean()方法)时都会创建一个新的bean实例。根据经验,对有状态的bean应该使用prototype作用域,而对无状态的bean则应该使用singleton作用域。
下图演示了Spring的prototype作用域。请注意,通常情况下,DAO不会被配置成prototype,因为DAO通常不会持有任何会话状态,因此应该使用singleton作用域。
要在XML中将bean定义成prototype,可以这样配置:
				<!-- using spring-beans-2.0.dtd -->
<bean id="accountService" class="com.foo.DefaultAccountService" scope="prototype"/>

<!-- the following is equivalent and preserved for backward compatibility in spring-beans.dtd -->
<bean id="accountService" class="com.foo.DefaultAccountService" singleton="false"/>
对于prototype作用域的bean,有一点非常重要,那就是Spring不能对一个prototype bean的整个生命周期负责:容器在初始化、配置、装饰或者是装配完一个prototype实例后,将它交给客户端,随后就对该prototype实例不闻不问了。不管何种作用域,容器都会调用所有对象的初始化生命周期回调方法。但对prototype而言,任何配置好的析构生命周期回调方法都将不会被调用。清除prototype作用域的对象并释放任何prototype bean所持有的昂贵资源,都是客户端代码的职责。(让Spring容器释放被prototype作用域bean占用资源的一种可行方式是,通过使用bean的后置处理器,该处理器持有要被清除的bean的引用。)
谈及prototype作用域的bean时,在某些方面你可以将Spring容器的角色看作是Java new操作的替代者。任何迟于该时间点的生命周期事宜都得交由客户端来处理。(在Section 3.5.1, “生命周期回调”一节中会进一步讲述Spring容器中的bean生命周期。)
当使用依赖于prototype bean的singleton-scoped bean时,请注意依赖是在实例化时处理的。这也就是说,如果要把一个prototype-scoped bean注入到singleton-scoped bean,实际上只是实例化一个新的prototype bean注入到 singleton bean...但这是全部。这种情况下,singleton-scoped bean获得的prototype实例是唯一的。
然而,你可能需要在运行期让singleton-scoped bean每次都获得prototype-scoped bean的新实例。在这种情况下,只将prototype-scoped bean注入到你的singleton bean中是没有用的,因为正如上文所说的,仅仅在当Spring容器实例化singleton bean并且处理注入的依赖时,生成唯一实例。如果你需要在运行期一次又一次的生成(prototype) bean的新实例,你可以参考Section 3.3.7, “方法注入”
| 向后兼容性:在XML中指定生命周期作用域 |
|---|---|
如果你在bean定义文件中引用'spring-beans.dtd' DTD, 要显式说明bean的生命周期作用域你必须使用"singleton"属性(记住singleton生命周期作用域是默认的)。 如果引用的是'spring-beans-2.0.dtd' DTD或者是Spring 2.0 XSD schema, 那么需要使用"scope"属性(因为"singleton"属性被删除了, 新的DTD和XSD文件使用"scope"属性) 简单地说,如果你用"singleton"属性那么就必须在那个文件里 引用'spring-beans.dtd' DTD。 如果你用"scope"属性那么必须 在那个文件里引用'spring-beans-2.0.dtd' DTD 或'spring-beans-2.0.xsd' XSD。 | |
其他作用域,即request、session以及global session 仅在基于web的应用中使用(不必关心你所采用的是什么web应用框架)。
| Note |
|---|---|
下面介绍的作用域仅仅在使用基于web的Spring ApplicationContext实现(如XmlWebApplicationContext)时有用。 如果在普通的Spring IoC容器中,比如像XmlBeanFactory或ClassPathXmlApplicationContext, 尝试使用这些作用域,你将会得到一个IllegalStateException异常(未知的bean作用域)。 | |
要使用request、session和 global session作用域的bean(即具有web作用域的bean), 在开始设置bean定义之前,还要做少量的初始配置。请注意,假如你只想要“常规的”作用域,(singleton和prototype),就不需要这一额外的设置。
在目前的情况下,根据你的特定servlet环境,有多种方法来完成这一初始设置...
如果你用Spring Web MVC,即用SpringDispatcherServlet或DispatcherPortlet来处理请求,则不需要做特别的配置:DispatcherServlet 和 DispatcherPortlet已经处理了所有有关的状态
当使用了Spring's DispatcherServlet以外的Servlet 2.4及以上的Web容器时(如使用JSF或Struts),你需要在Web应用的'web.xml'文件中增加 javax.servlet.ServletRequestListener 定义
<web-app>
  ...
  <listener>
    <listener-class>org.springframework.web.context.request.RequestContextListener</listener-class>
  </listener>
  ...
</web-app>
如果你用的是早期版本的web容器(Servlet 2.4以前的版本),那么你要使用一个javax.servlet.Filter的实现。请看下面的web.xml配置片段:
<web-app>
  ..
  <filter>
    <filter-name>requestContextFilter</filter-name>
    <filter-class>org.springframework.web.filter.RequestContextFilter</filter-class>
  </filter>
  <filter-mapping>
    <filter-name>requestContextFilter</filter-name>
    <url-pattern>/*</url-pattern>
  </filter-mapping>
  ...
</web-app>RequestContextListener和RequestContextFilter两个类做的都是同样的工作: 将HTTP request对象绑定到为该请求提供服务的Thread。 这使得具有request和session作用域的bean能够在后面的调用链中被访问到。
考虑下面bean定义:
<bean id="loginAction" class="com.foo.LoginAction" scope="request"/>
针对每次HTTP请求,Spring容器会根据loginAction bean定义创建一个全新的LoginAction bean实例, 且该loginAction bean实例仅在当前HTTP request内有效,因此可以根据需要放心的更改所建实例的内部状态, 而其他请求中根据loginAction bean定义创建的实例,将不会看到这些特定于某个请求的状态变化。 当处理请求结束,request作用域的bean实例将被销毁。
考虑下面bean定义:
<bean id="userPreferences" class="com.foo.UserPreferences" scope="session"/>
针对某个HTTP Session,Spring容器会根据userPreferences bean定义创建一个全新的userPreferences bean实例, 且该userPreferences bean仅在当前HTTP Session内有效。 与request作用域一样,你可以根据需要放心的更改所创建实例的内部状态,而别的HTTP Session中根据userPreferences创建的实例, 将不会看到这些特定于某个HTTP Session的状态变化。 当HTTP Session最终被废弃的时候,在该HTTP Session作用域内的bean也会被废弃掉。
考虑下面bean定义:
<bean id="userPreferences" class="com.foo.UserPreferences" scope="globalSession"/>
global session作用域类似于标准的HTTP Session作用域,不过它仅仅在基于portlet的web应用中才有意义。Portlet规范定义了全局Session的概念,它被所有构成某个portlet web应用的各种不同的portlet所共享。在global session作用域中定义的bean被限定于全局portlet Session的生命周期范围内。
请注意,假如你在编写一个标准的基于Servlet的web应用,并且定义了一个或多个具有global session作用域的bean,系统会使用标准的HTTP Session作用域,并且不会引起任何错误。
能够在HTTP request或者Session(甚至自定义)作用域中定义bean固然很好,但是Spring IoC容器除了管理对象(bean)的实例化,同时还负责协作者(或者叫依赖)的实例化。如果你打算将一个Http request范围的bean注入到另一个bean中,那么需要注入一个AOP代理来替代被注入的作用域bean。也就是说,你需要注入一个代理对象,该对象具有与被代理对象一样的公共接口,而容器则可以足够智能的从相关作用域中(比如一个HTTP request)获取到真实的目标对象,并把方法调用委派给实际的对象。
| Note |
|---|---|
<aop:scoped-proxy/> 不能和作用域为singleton或prototype的bean一起使用。为singleton bean创建一个scoped proxy将抛出BeanCreationException异常。 | |
让我们看一下将相关作用域bean作为依赖的配置,配置并不复杂(只有一行),但是对理解“为何这么做”以及“如何做”是很重要的。
<?xml version="1.0" encoding="UTF-8"?>
<beans xmlns="http://www.springframework.org/schema/beans"
       xmlns:xsi="http://www.w3.org/2001/XMLSchema-instance"
       xmlns:aop="http://www.springframework.org/schema/aop"
       xsi:schemaLocation="
http://www.springframework.org/schema/beans http://www.springframework.org/schema/beans/spring-beans-2.5.xsd
http://www.springframework.org/schema/aop http://www.springframework.org/schema/aop/spring-aop-2.5.xsd">

    <!-- a HTTP Session-scoped bean exposed as a proxy -->
    <bean id="userPreferences" class="com.foo.UserPreferences" scope="session">

          <!-- this next element effects the proxying of the surrounding bean -->
					<aop:scoped-proxy/>
    </bean>

    <!-- a singleton-scoped bean injected with a proxy to the above bean -->
    <bean id="userService" class="com.foo.SimpleUserService">

        <!-- a reference to the proxied
						'userPreferences' bean -->
        <property name="userPreferences" ref="userPreferences"/>

    </bean>
</beans>
要创建这样的代理,只需要在Bean作用域定义中增加一个<aop:scoped-proxy/>子元素(为了让容器可以有效的使用基于类(而不是接口)的代理,你需要在classpath中加入CGLIB包, 并且要使用Appendix A, XML Schema-based configuration配置方式)。为什么在request,session, globalSession 和 '自定义作用域' 需要<aop:scoped-proxy/>元素?在下面配置片段中可以找到解释(注意下面 'userPreferences' Bean定义是不完整的):
<bean id="userPreferences" class="com.foo.UserPreferences" scope="session"/>

<bean id="userManager" class="com.foo.UserManager">
    <property name="userPreferences" ref="userPreferences"/>
</bean>
从上述配置中可以很明显的看到singleton bean userManager被注入了一个指向HTTP Session作用域bean userPreferences的引用。singleton userManager bean会被容器仅实例化一次,并且其依赖(即userPreferences bean)也仅被注入一次。这意味着,userManager在理论上只会操作同一个userPreferences对象,即原先被注入的那个bean。而注入一个HTTP Session作用域的bean作为依赖,有违我们的初衷。因为我们想要的只是一个userManager对象,在它进入一个HTTP Session生命周期时,我们希望去使用一个HTTP Session的userPreferences对象。
当注入某种类型对象时,该对象实现了和UserPreferences类一样的公共接口(即UserPreferences实例)。并且不论我们底层选择了何种作用域机制(HTTP request、Session等等),容器都会足够智能的获取到真正的 UserPreferences对象,因此我们需要将该对象的代理注入到userManager bean中, 而userManager bean并不会意识到它所持有的是一个指向UserPreferences引用的代理。在本例中,当UserManager实例调用了一个使用UserPreferences对象的方法时,实际调用的是代理对象的方法。随后代理对象会从HTTP Session获取真正的UserPreferences对象,并将方法调用委派给获取到的实际的UserPreferences对象。
这就是当把request-, session-, 和 globalSession-scoped beans 注入到协作对象中时,需要以下的正确而完整的配置:
<bean id="userPreferences" class="com.foo.UserPreferences" scope="session">

						<aop:scoped-proxy/>

</bean>

<bean id="userManager" class="com.foo.UserManager">
    <property name="userPreferences" ref="userPreferences"/>
</bean>默认情况下,当一个bean有<aop:scoped-proxy/>标记时,Spring容器将为它创建一个基于CGLIB的类代理,这意味着你需要 将CGLIB库添加到应用的classpath中。
注意:CGLIB代理仅仅拦截public方法的调用!对于非public的方法调用,不会对目标对象产生委托。
你可以将<aop:scoped-proxy/>的属性'proxy-target-class'设置为'false'来选择标准JDK推荐的基于接口的代理,这样就不需要在应用的classpath中增加额外的库。但是,这就意味着类必须实现至少一个接口。并且所有的协作者必须通过某一个 接口来引用bean。
						<!-- DefaultUserPreferences implements the UserPreferences interface -->
<bean id="userPreferences" class="com.foo.DefaultUserPreferences" scope="session">
    <aop:scoped-proxy proxy-target-class="false"
						/>
</bean>

<bean id="userManager" class="com.foo.UserManager">
    <property name="userPreferences" ref="userPreferences"/>
</bean>
题为Section 6.6, “代理机制”的章节也可以有助于理解对选择基于类还是基于接口的代理的细微差别。
在Spring 2.0中,Spring的bean作用域机制是可以扩展的。这意味着,你不仅可以使用Spring提供的预定义bean作用域;还可以定义自己的作用域,甚至重新定义现有的作用域(不提倡这么做,而且你不能覆盖内置的singleton和prototype作用域)。
作用域是由org.springframework.beans.factory.config.Scope接口定义的。要将你自己的自定义作用域集成到Spring容器中,需要实现该接口。你可能想参考Spring框架本身提供的Scope实现来了解如何创建自己的实现,Scope Javadoc展示了创建自定义作用域的实现的更多细节
Scope接口提供了四个方法来处理获取对象,移除对象和必要的时候'销毁'对象。
第一个方法可以从作用域中获取对象。例如,Session作用域的实现会返回一个session-scoped bean(如果不存在,则返回一个绑定了Session引用的新实例)。
Object get(String name, ObjectFactory objectFactory)
第二个方法可以从作用域中移除对象。例如,session作用域的实现可以从session中移除并返回session-scoped bean(如果没有找到相应名称的对象昂,则可以返回null)。
Object remove(String name)
第三个方法是注册作用域析构的回调方法,当作用域销毁或作用域中的某个对象销毁时候会执行。请参考Javadoc或Spring Scope的实现获得更多析构回调的信息。
void registerDestructionCallback(String name, Runnable destructionCallback)
The last method deals with obtaining the conversation identifier for the underlying scope. This identifier is different for each scope. For a session for example, this can be the session identifier.
最后一个方法处理作用域的会话标识。对每一个作用域来说标识是不一样的。例如,对于session,将获得session标识
String getConversationId()
在你编写和测试完一个或多个自定义Scope实现后,你需要让Spring容器装配你的作用域。把一个新的Scope 注册到Spring 容器中的核心方法定义在ConfigurableBeanFactory接口中,下面就是这个方法的示例:
void registerScope(String scopeName, Scope scope);
registerScope(..) 方法的第一个参数是一个作用域的唯一名称,例如,Spring 容器中的'singleton'和'prototype'。registerScope(..) 方法的第二个参数是你要注册和使用的自定义Scope的实例。
假如你实现了自定义的Scope,并像下面例子一样进行了注册:
					// note: the ThreadScope class does not ship with the Spring Framework
Scope customScope = new ThreadScope();
beanFactory.registerScope("thread", scope);
你可以象下面一样来创建自定义作用域的规则:
<bean id="..." class="..." scope="thread"/>有了自定义作用域的实现,你将不仅仅可以使用以上的注册方式,还可以使用CustomScopeConfigurer类来进行声明式注册,
以下是使用CustomScopeConfigurer来进行声明式注册的自定义作用域的例子:
<?xml version="1.0" encoding="UTF-8"?>
<beans xmlns="http://www.springframework.org/schema/beans"
       xmlns:xsi="http://www.w3.org/2001/XMLSchema-instance"
       xmlns:aop="http://www.springframework.org/schema/aop"
       xsi:schemaLocation="
http://www.springframework.org/schema/beans http://www.springframework.org/schema/beans/spring-beans-2.5.xsd
http://www.springframework.org/schema/aop http://www.springframework.org/schema/aop/spring-aop-2.5.xsd">

    <bean class="org.springframework.beans.factory.config.CustomScopeConfigurer">
        <property name="scopes">
            <map>
                <entry key="thread">
                    <bean class="com.foo.ThreadScope"/>
                </entry>
            </map>
        </property>
    </bean>

    <bean id="bar" class="x.y.Bar" scope="thread">
        <property name="name" value="Rick"/>
        <aop:scoped-proxy/>
    </bean>

    <bean id="foo" class="x.y.Foo">
        <property name="bar" ref="bar"/>
    </bean>

</beans>Spring提供了几个标志接口(marker interface),这些接口用来改变容器中bean的行为;它们包括InitializingBean和DisposableBean。实现这两个接口的bean在初始化和析构时容器会调用前者的afterPropertiesSet()方法,以及后者的destroy()方法。
Spring在内部使用BeanPostProcessor实现来处理它能找到的任何标志接口并调用相应的方法。如果你需要自定义特性或者生命周期行为,你可以实现自己的 BeanPostProcessor。关于这方面更多的内容可以看Section 3.7, “容器扩展点”。
下面讲述了几个生命周期标志接口。在附录中会提供相关的示意图来展示Spring如何管理bean,以及生命周期特性如何改变bean的内在特性。
实现org.springframework.beans.factory.InitializingBean接口允许容器在设置好bean的所有必要属性后,执行初始化事宜。InitializingBean接口仅指定了一个方法:
void afterPropertiesSet() throws Exception;
通常,要避免使用InitializingBean接口并且不鼓励使用该接口,因为这样会将代码和Spring耦合起来,有一个可选的方案是,可以在Bean定义中指定一个普通的初始化方法,然后在XML配置文件中通过指定init-method属性来完成。如下面的定义所示:
<bean id="exampleInitBean" class="examples.ExampleBean" init-method="init"/>
public class ExampleBean {

    public void init() {
        // do some initialization work
    }
}
...效果与下面完全一样...
<bean id="exampleInitBean" class="examples.AnotherExampleBean"/>
public class AnotherExampleBean implements InitializingBean {

    public void afterPropertiesSet() {
        // do some initialization work
    }
}
... 但是没有将代码与Spring耦合在一起。
实现org.springframework.beans.factory.DisposableBean接口的bean允许在容器销毁该bean的时候获得一次回调。DisposableBean接口也只规定了一个方法:
void destroy() throws Exception;
通常,要避免使用DisposableBean标志接口而且不鼓励使用该接口,因为这样会将代码与Spring耦合在一起,有一个可选的方案是,在bean定义中指定一个普通的析构方法,然后在XML配置文件中通过指定destroy-method属性来完成。如下面的定义所示:
<bean id="exampleInitBean" class="examples.ExampleBean" destroy-method="cleanup"/>
public class ExampleBean {

    public void cleanup() {
        // do some destruction work (like releasing pooled connections)
    }
}
...效果与下面完全一样...
<bean id="exampleInitBean" class="examples.AnotherExampleBean"/>
public class AnotherExampleBean implements DisposableBean {

    public void destroy() {
        // do some destruction work (like releasing pooled connections)
    }
}
... 但是没有将代码与Spring耦合在一起。
如果有人没有采用Spring所指定的InitializingBean和DisposableBean回调接口来编写初始化和析构方法回调,会发现自己正在编写的方法,其名称莫过于init(), initialize(),dispose()等等。这种生命周期回调方法的名称最好在一个项目范围内标准化,这样团队中的开发人员就可以使用同样的方法名称,并且确保了某种程度的一致性。
Spring容器通过配置可以实现对每个 bean初始化时的查找和销毁时的回调调用。这也就是说,一个应用的开发者可以借助于初始化的回调方法init() 轻松的写一个类(不必想XML配置文件那样为每个bean都配置一个'init-method="init"'属性)。Spring IoC容器在创建bean的时候将调用这个方法 (这和之前描述的标准生命周期回调一致)。
为了完全弄清如何使用该特性,让我们看一个例子。出于示范的目的,假设一个项目的编码规范中约定所有的初始化回调方法都被命名为init()而析构回调方法被命名为destroy()。遵循此规则写成的类如下所示:
public class DefaultBlogService implements BlogService {

    private BlogDao blogDao;

    public void setBlogDao(BlogDao blogDao) {
        this.blogDao = blogDao;
    }

    // this is (unsurprisingly) the initialization callback method
    public void init() {
        if (this.blogDao == null) {
            throw new IllegalStateException("The [blogDao] property must be set.");
        }
    }
}
<beans default-init-method="init">
<bean id="blogService" class="com.foo.DefaultBlogService">
<property name="blogDao" ref="blogDao" />
</bean>
</beans>注意在顶级的<beans/>元素中的'default-init-method'属性。这个属性的含义是Spring IoC容器在bean创建和装配的时候会将'init'方法作为实例化回调方法。如果类有这个方法,则会在适当的时候执行。
销毁回调方法配置是相同的 (XML配置),在顶级的<beans/>元素中使用 'default-destroy-method' 属性。
使用这个功能可以把你从位每个bean指定初始化和销毁回调的繁杂工作中解救出来。为了一致性,应该强制性的为初始化和销毁回调方法采用一致的命名规则。
当已经存在的类的初始化方法的命名规则与惯例有差异的时候,你应该始终使用<bean/>元素中的'init-method'和'destroy-method'属性(在XML配置中)来覆盖默认的方式。
最后,请注意Spring容器保证在bean的所有依赖都满足后立即执行配置的初始化回调。这意味着初始化回调在原生bean上调用,这也意味着这个时候任何诸如AOP拦截器之类的将不能被应用。一个目标bean是首先完全创建,然后才应用诸如AOP代理等拦截器链。注意,如果目标bean和代理是分开定义了,你的代码甚至可以绕开代理直接和原生bean通信。因此,在初始化方法上使用拦截器将产生未知的结果,因为这将目标bean和它的代理/拦截器的生命周期绑定并且留下了和初始bean直接通信这样奇怪的方式。
As of Spring 2.5, there are three options for controlling bean lifecycle behavior: the InitializingBean and DisposableBean callback interfaces; custom init() and destroy() methods; and the @PostConstruct and @PreDestroy annotations.
在Spring2.5中有三种方式可以控制bean的生命周期行为: InitializingBean 和 DisposableBean 回调接口;自定义init() 和 destroy() 方法; @PostConstruct 和@PreDestroy annotations.
当组合不同的生命周期机制时 - 例如,类层次中使用了不同的生命周期机制 - 开发者必须注意这些机制的应用顺序,下面是初始化方法中的顺序:
@PostConstruct元注释
InitializingBean的afterPropertiesSet()定义
自定义init()方法配置
析构方法调用顺序是相同的:
@PreDestroy元注释
DisposableBean的destroy()定义
自定义destroy()方法
| Note |
|---|---|
如果bean存在多种的生命周期机制配置并且每种机制都配置为不同的方法名, 那所有配置的方法将会按照上面的顺利执行。然而如果配置了相同的方法名 - 例如, init()初始化方法 - 采用多种机制配置后,只会执行一次。 | |
| Note |
|---|---|
在基于web的ApplicationContext实现中已有相应的代码来处理关闭web应用时如何恰当地关闭Spring IoC容器。 | |
如果你正在一个非web应用的环境下使用Spring的IoC容器,例如在桌面富客户端环境下,你想让容器优雅的关闭,并调用singleton bean上的相应析构回调方法,你需要在JVM里注册一个“关闭钩子”(shutdown hook)。这一点非常容易做到,并且将会确保你的Spring IoC容器被恰当关闭,以及所有由单例持有的资源都会被释放(当然,为你的单例配置销毁回调,并正确实现销毁回调方法,依然是你的工作)。
为了注册“关闭钩子”,你只需要简单地调用在AbstractApplicationContext实现中的registerShutdownHook()方法即可。也就是:
import org.springframework.context.support.AbstractApplicationContext;
import org.springframework.context.support.ClassPathXmlApplicationContext;

public final class Boot {

    public static void main(final String[] args) throws Exception {
        AbstractApplicationContext ctx
            = new ClassPathXmlApplicationContext(new String []{"beans.xml"});

        // add a shutdown hook for the above context...
        ctx.registerShutdownHook();

        // app runs here...
					// main method exits, hook is called prior to the app shutting down...
    }
}对于实现了org.springframework.beans.factory.BeanFactoryAware接口的类,当它被BeanFactory创建后,它会拥有一个指向创建它的BeanFactory的引用。
public interface BeanFactoryAware {

    void setBeanFactory(BeanFactory beanFactory) throws BeansException;
}这样bean可以以编程的方式操控创建它们的BeanFactory,当然我们可以将引用的BeanFactory造型(cast)为已知的子类型来获得更多的功能。它主要用于通过编程来取得BeanFactory所管理的其他bean。虽然在有些场景下这个功能很有用,但是一般来说应该尽量避免使用,因为这样将使代码与Spring耦合在一起,而且也有违反转控制的原则(协作者应该作为属性提供给bean)。
与BeanFactoryAware等效的另一种选择是使用org.springframework.beans.factory.config.ObjectFactoryCreatingFactoryBean。不过该方法依然没有降低与Spring的耦合,但是它并没有像BeanFactoryAware那样,违反IoC原则。)
ObjectFactoryCreatingFactoryBean是 FactoryBean 的一个实现,它返回一个指向工厂对象的引用,该对象将执行bean的查找。ObjectFactoryCreatingFactoryBean类实现了BeanFactoryAware接口;被实际注入到客户端bean的是ObjectFactory接口的一个实例。这是Spring提供的一个接口(因而依旧没有完全与Spring解耦),客户端可以使用ObjectFactory的getObject()方法来查找bean(在其背后,ObjectFactory实例只是简单的将调用委派给BeanFactory,让其根据bean的名称执行实际的查找)。你要做的全部事情就是给ObjectFactoryCreatingFactoryBean提供待查找bean的名字。让我们看一个例子:
package x.y;

public class NewsFeed {

    private String news;

    public void setNews(String news) {
        this.news = news;
    }

    public String getNews() {
        return this.toString() + ": '" + news + "'";
    }
}
package x.y;
import org.springframework.beans.factory.ObjectFactory;
public class NewsFeedManager {
private ObjectFactory factory;
public void setFactory(ObjectFactory factory) {
this.factory = factory;
}
public void printNews() {
// here is where the lookup is performed; note that there is no
// need to hard code the name of the bean that is being looked up...
NewsFeed news = (NewsFeed) factory.getObject();
System.out.println(news.getNews());
}
}下述是XML配置:
<beans>
    <bean id="newsFeedManager" class="x.y.NewsFeedManager">
        <property name="factory">
            <bean
class="org.springframework.beans.factory.config.ObjectFactoryCreatingFactoryBean">
                <property name="targetBeanName">
                    <idref local="newsFeed" />
                </property>
            </bean>
        </property>
    </bean>
    <bean id="newsFeed" class="x.y.NewsFeed" scope="prototype">
        <property name="news" value="... that's fit to print!" />
    </bean>
</beans>这里有一个测试用的小程序:在NewsFeedManager的printNews()方法里,每次针对被注入的ObjectFactory的调用,实际上返回的是一个新的(prototype)newsFeed bean实例。
import org.springframework.context.ApplicationContext;
import org.springframework.context.support.ClassPathXmlApplicationContext;
import x.y.NewsFeedManager;

public class Main {

    public static void main(String[] args) throws Exception {

        ApplicationContext ctx = new ClassPathXmlApplicationContext("beans.xml");
        NewsFeedManager manager = (NewsFeedManager) ctx.getBean("newsFeedManager");
        manager.printNews();
        manager.printNews();
    }
}
上述程序的执行输出如下所示(当然,返回结果会根据你机器的不同而不同)
x.y.NewsFeed@1292d26: '... that's fit to print!'
x.y.NewsFeed@5329c5: '... that's fit to print!'
在Spring2.5中,可以利用BeanFactory的自动装配作为实现 BeanFactoryAware接口的可选方式。 "传统"的constructor和byType 自动装配模式(在Section 3.3.5, “自动装配(autowire)协作者”中有描述)对无论是构造器参数或setter方法都能提供 BeanFactory类型的 依赖。这有更多的灵活性(包括自动装配属性和多参数方法)。如果使用新的基于元注释的自动装配特性,只要属性、 构造器、方法包含有@Autowired元注释时,BeanFactory将会自动装配到对应的属性、构造器、方法中。请参阅Section 3.11.1, “@Autowired”。
在bean定义中包含了大量的配置信息,其中包括容器相关的信息(比如初始化方法、静态工厂方法名等等)以及构造器参数和属性值。子bean定义就是从父bean定义继承配置数据的bean定义。它可以覆盖父bean的一些值,或者添加一些它需要的值。使用父/子bean定义的形式可以节省很多的输入工作。实际上,这就是一种模板形式。
当以编程的方式使用BeanFactory时,子bean定义用ChildBeanDefinition类表示。大多数用户从来不需要以这个方式使用它们,而是以类似XmlBeanFactory中的声明方式去配置bean定义。当使用基于XML的配置元数据时,给'parent'属性指定值,意味着子bean定义的声明。
<bean id="inheritedTestBean" abstract="true"
    class="org.springframework.beans.TestBean">
  <property name="name" value="parent"/>
  <property name="age" value="1"/>
</bean>

<bean id="inheritsWithDifferentClass"
      class="org.springframework.beans.DerivedTestBean"
      parent="inheritedTestBean" init-method="initialize">

  <property name="name" value="override"/>
  <!-- the age property value of 1 will be inherited from  parent -->

</bean>
如果子bean定义没有指定class属性,它将使用父bean定义的class属性,当然也可以覆盖它。在后面一种情况中,子bean的class属性值必须同父bean兼容,也就是说它必须接受父bean的属性值。
一个子bean定义可以从父bean继承构造器参数值、属性值以及覆盖父bean的方法,并且可以有选择地增加新的值。如果指定了init-method,destroy-method和/或静态factory-method,它们就会覆盖父bean相应的设置。
剩余的设置将总是从子bean定义处得到:依赖、自动装配模式、依赖检查、singleton、作用域和延迟初始化。
注意在上面的例子中,我们使用abstract属性显式地将父bean定义标记为抽象的。下面是个父bean定义并没有指定class属性的例子,其中父bean必须显式地标上abstract:
<bean id="inheritedTestBeanWithoutClass" abstract="true">
    <property name="name" value="parent"/>
    <property name="age" value="1"/>
</bean>

<bean id="inheritsWithClass" class="org.springframework.beans.DerivedTestBean"
    parent="inheritedTestBeanWithoutClass" init-method="initialize">
  <property name="name" value="override"/>
  <!-- age will inherit the value of 1 from the parent bean definition-->
</bean>由于这样的父bean是不完整的,而且还被显式标记为抽象的,因而它无法得到自己的实例。抽象bean定义可作为子bean定义的模板。若要尝试单独使用这样的父bean(比如将它作为其他bean的ref属性而引用,或者直接使用这个父bean的id作为参数调用getBean()方法),将会导致错误。同样地,容器内部的preInstantiateSingletons()方法会完全忽略abstract的bean定义。
| Note |
|---|---|
默认情况下,ApplicationContext(不是BeanFactory)会预实例化所有singleton的bean。因此很重要的一点是:如果你只想把一个(父)bean定义当作模板使用,而它又指定了class属性,那么你就得将'abstract'属性设置为'true',否则应用上下文将会(试着)预实例化抽象bean。 | |
Spring框架的IoC容器被设计为可扩展的。通常我们并不需要子类化各个BeanFactory或ApplicationContext实现类。而通过plugin各种集成接口实现来进行扩展。下面几节专门描述这些不同的集成接口。
我们关注的第一个扩展点是BeanPostProcessor接口。它定义了几个回调方法,实现该接口可提供自定义(或默认地来覆盖容器)的实例化逻辑、依赖解析逻辑等。如果你想在Spring容器完成bean的实例化、配置和其它的初始化后执行一些自定义逻辑,你可以插入一个或多个的BeanPostProcessor实现。
如果配置了多个BeanPostProcessor,那么可以通过设置'order'属性来控制BeanPostProcessor的执行次序(仅当BeanPostProcessor实现了Ordered接口时,你才可以设置此属性,因此在编写自己的BeanPostProcessor实现时,就得考虑是否需要实现Ordered接口);请参考BeanPostProcessor和Ordered接口的JavaDoc以获取更详细的信息。
| Note |
|---|---|
BeanPostProcessor可以对bean(或对象)的多个实例进行操作;也就是说,Spring IoC容器会为你实例化bean,然后BeanPostProcessor去处理它。 如果你想修改实际的bean定义,则会用到BeanFactoryPostProcessor(详情见Section 3.7.2, “用BeanFactoryPostProcessor定制配置元数据”)。 BeanPostProcessor的作用域是容器级的,它只和所在容器有关。如果你在容器中定义了BeanPostProcessor,它仅仅对此容器中的bean进行后置处理。BeanPostProcessor将不会对定义在另一个容器中的bean进行后置处理,即使这两个容器都处在同一层次上。 | |
org.springframework.beans.factory.config.BeanPostProcessor接口有两个回调方法可供使用。当一个该接口的实现类被注册(如何使这个注册生效请见下文)为容器的后置处理器(post-processor)后,对于由此容器所创建的每个bean实例在初始化方法(如afterPropertiesSet和任意已声明的init方法)调用前,后置处理器都会从容器中分别获取一个回调。后置处理器可以随意对这个bean实例执行它所期望的动作,包括完全忽略此回调。一个bean后置处理器通常用来检查标志接口,或者做一些诸如将一个bean包装成一个proxy的事情;一些Spring AOP的底层处理也是通过实现bean后置处理器来执行代理包装逻辑。
重要的一点是,BeanFactory和ApplicationContext对待bean后置处理器稍有不同。ApplicationContext会自动检测在配置文件中实现了BeanPostProcessor接口的所有bean,并把它们注册为后置处理器,然后在容器创建bean的适当时候调用它。部署一个后置处理器同部署其他的bean并没有什么区别。而使用BeanFactory实现的时候,bean 后置处理器必须通过下面类似的代码显式地去注册:
ConfigurableBeanFactory factory = new XmlBeanFactory(...);

// now register any needed BeanPostProcessor instances
MyBeanPostProcessor postProcessor = new MyBeanPostProcessor();
factory.addBeanPostProcessor(postProcessor);

// now start using the factory因为显式注册的步骤不是很方便,这也是为什么在各种Spring应用中首选ApplicationContext的一个原因,特别是在使用BeanPostProcessor时。
| BeanPostProcessors和AOP自动代理(auto-proxying) |
|---|---|
实现了BeanPostProcessor 接口的类是特殊的, 会被容器特别对待. 所有 BeanPostProcessors和直接引用的bean 会作为ApplicationContext一部分在启动时初始化, 然后所有的BeanPostProcessors会注册入一个列表并应用于之后的bean。AOP自动代理实现了BeanPostProcessor,所以BeanPostProcessors或bean的直接引用不会被自动代理(因此不会被aspects"织入")。 对这些bean来说,你可能看到下面的日志信息:“Bean 'foo' is not eligible for getting processed by all BeanPostProcessors (如:不能被auto_proxying)” | |
关于如何在ApplicationContext中编写、注册并使用BeanPostProcessor,会在接下的例子中演示。
第一个实例似乎不太吸引人,但是它适合用来阐述BeanPostProcessor的基本用法。我们所有的工作是编写一个BeanPostProcessor的实现,它仅仅在容器创建每个bean时调用bean的toString()方法并且将结果打印到系统控制台。它是没有很大的用处,但是可以让我们对BeanPostProcessor有一个基本概念。
下面是BeanPostProcessor具体实现类的定义:
package scripting;

import org.springframework.beans.factory.config.BeanPostProcessor;
import org.springframework.beans.BeansException;

public class InstantiationTracingBeanPostProcessor implements BeanPostProcessor {

    // simply return the instantiated bean as-is
    public Object postProcessBeforeInitialization(Object bean, String beanName) throws BeansException {
        return bean; // we could potentially return any object reference here...
    }

    public Object postProcessAfterInitialization(Object bean, String beanName) throws BeansException {
        System.out.println("Bean '" + beanName + "' created : " + bean.toString());
        return bean;
    }
}
<?xml version="1.0" encoding="UTF-8"?>
<beans xmlns="http://www.springframework.org/schema/beans"
xmlns:xsi="http://www.w3.org/2001/XMLSchema-instance"
xmlns:lang="http://www.springframework.org/schema/lang"
xsi:schemaLocation="
http://www.springframework.org/schema/beans http://www.springframework.org/schema/beans/spring-beans-2.5.xsd
http://www.springframework.org/schema/lang http://www.springframework.org/schema/lang/spring-lang-2.5.xsd">
<lang:groovy id="messenger"
script-source="classpath:org/springframework/scripting/groovy/Messenger.groovy">
<lang:property name="message" value="Fiona Apple Is Just So Dreamy."/>
</lang:groovy>
<!--
when the above bean ('messenger') is instantiated, this custom
BeanPostProcessor implementation will output the fact to the system console
-->
<bean class="scripting.InstantiationTracingBeanPostProcessor"/>
</beans>注意InstantiationTracingBeanPostProcessor是如此简单,甚至没有名字,由于被定义成一个bean,因而它跟其它的bean没什么两样(上面的配置中也定义了由Groovy脚本支持的bean,Spring2.0动态语言支持的细节请见Chapter 24, 动态语言支持)。
下面是测试代码:
import org.springframework.context.ApplicationContext;
import org.springframework.context.support.ClassPathXmlApplicationContext;
import org.springframework.scripting.Messenger;

public final class Boot {

    public static void main(final String[] args) throws Exception {
        ApplicationContext ctx = new ClassPathXmlApplicationContext("scripting/beans.xml");
        Messenger messenger = (Messenger) ctx.getBean("messenger");
        System.out.println(messenger);
    }
}
上面程序执行时的输出将是(或象)下面这样:
Bean 'messenger' created : org.springframework.scripting.groovy.GroovyMessenger@272961
org.springframework.scripting.groovy.GroovyMessenger@272961
在Spring的BeanPostProcessor实现中调用标志接口或使用注解是扩展Spring IoC容器的常用方法。对于注解的用法详见Section 25.3.1, “@Required”,这里没有做深入的说明。通过定制BeanPostProcessor实现,可以使用注解来指定各种JavaBean属性值并在发布的时候被注入相应的bean中。
我们将看到的下一个扩展点是org.springframework.beans.factory.config.BeanFactoryPostProcessor。这个接口跟BeanPostProcessor类似,BeanFactoryPostProcessor可以对bean的定义(配置元数据)进行处理。也就是说,Spring IoC容器允许BeanFactoryPostProcessor在容器实际实例化任何其它的bean之前读取配置元数据,并有可能修改它。
如果你愿意,你可以配置多个BeanFactoryPostProcessor。你还能通过设置'order'属性来控制BeanFactoryPostProcessor的执行次序(仅当BeanFactoryPostProcessor实现了Ordered接口时你才可以设置此属性,因此在实现BeanFactoryPostProcessor时,就应当考虑实现Ordered接口);请参考BeanFactoryPostProcessor和Ordered接口的JavaDoc以获取更详细的信息。
| Note |
|---|---|
如果你想改变实际的bean实例(例如从配置元数据创建的对象),那么你最好使用BeanPostProcessor(见上面Section 3.7.1, “用BeanPostProcessor定制bean”中的描述) 同样地,BeanFactoryPostProcessor的作用域范围是容器级的。它只和你所使用的容器有关。如果你在容器中定义一个BeanFactoryPostProcessor,它仅仅对此容器中的bean进行后置处理。BeanFactoryPostProcessor不会对定义在另一个容器中的bean进行后置处理,即使这两个容器都是在同一层次上。 | |
bean工厂后置处理器可以手工(如果是BeanFactory)或自动(如果是ApplicationContext)地施加某些变化给定义在容器中的配置元数据。Spring自带了许多bean工厂后置处理器,比如下面将提到的PropertyResourceConfigurer和PropertyPlaceholderConfigurer以及BeanNameAutoProxyCreator,它们用于对bean进行事务性包装或者使用其他的proxy进行包装。BeanFactoryPostProcessor也能被用来添加自定义属性编辑器。
在一个BeanFactory中,应用BeanFactoryPostProcessor的过程是手工的,如下所示:
XmlBeanFactory factory = new XmlBeanFactory(new FileSystemResource("beans.xml"));

// bring in some property values from a Properties file
PropertyPlaceholderConfigurer cfg = new PropertyPlaceholderConfigurer();
cfg.setLocation(new FileSystemResource("jdbc.properties"));

// now actually do the replacement
cfg.postProcessBeanFactory(factory);因为显式注册的步骤不是很方便,这也是为什么在不同的Spring应用中首选ApplicationContext的原因,特别是在使用BeanFactoryPostProcessor时。
ApplicationContext会检测部署在它之上实现了BeanFactoryPostProcessor接口的bean,并在适当的时候会自动调用bean工厂后置处理器。部署一个后置处理器同部属其他的bean并没有什么区别。
| Note |
|---|---|
正如BeanPostProcessor的情况一样,请不要将BeanFactoryPostProcessors标记为延迟加载。如果你这样做,Spring容器将不会注册它们,自定义逻辑就无法实现。如果你在<beans/>元素的定义中使用了'default-lazy-init'属性,请确信你的各个BeanFactoryPostProcessor标记为'lazy-init="false"'。 | |
PropertyPlaceholderConfigurer是个bean工厂后置处理器的实现,可以将BeanFactory定义中的一些属性值放到另一个单独的标准Java Properties文件中。这就允许用户在部署应用时只需要在属性文件中对一些关键属性(例如数据库URL,用户名和密码)进行修改,而不用对主XML定义文件或容器所用文件进行复杂和危险的修改。
考虑下面的XML配置元数据定义,它用占位符定义了DataSource。我们在外部的Properties文件中配置一些相关的属性。在运行时,我们为元数据提供一个PropertyPlaceholderConfigurer,它将会替换dataSource的属性值。
<bean class="org.springframework.beans.factory.config.PropertyPlaceholderConfigurer">
    <property name="locations">
        <value>classpath:com/foo/jdbc.properties</value>
    </property>
</bean>

<bean id="dataSource" destroy-method="close"
      class="org.apache.commons.dbcp.BasicDataSource">
    <property name="driverClassName" value="${jdbc.driverClassName}"/>
    <property name="url" value="${jdbc.url}"/>
    <property name="username" value="${jdbc.username}"/>
    <property name="password" value="${jdbc.password}"/>
</bean>
实际的值来自于另一个标准Java Properties格式的文件:
jdbc.driverClassName=org.hsqldb.jdbcDriver
jdbc.url=jdbc:hsqldb:hsql://production:9002
jdbc.username=sa
jdbc.password=root
在Spring 2.5中,context名字空间可能采用单一元素属性占位符的方式(多个路径提供一个逗号分隔的列表)
<context:property-placeholder location="classpath:com/foo/jdbc.properties"/>
PropertyPlaceholderConfigurer如果在指定的Properties文件中找不到你想使用的属性,它还会在Java的System类属性中查找。这个行为可以通过设置systemPropertiesMode属性来定制,它有三个值:让配置一直覆盖、让它永不覆盖及让它仅仅在属性文件中找不到该属性时才覆盖。请参考PropertiesPlaceholderConfigurer的JavaDoc以获得更多的信息。
| 类名替代 |
|---|---|
PropertyPlaceholderConfigurer可以在必须在运行时选择一个特性实现类时可以用来替代类名。例如: <bean class="org.springframework.beans.factory.config.PropertyPlaceholderConfigurer">
<property name="locations">
<value>classpath:com/foo/strategy.properties</value>
</property>
<property name="properties">
<value>custom.strategy.class=com.foo.DefaultStrategy</value>
</property>
</bean>
<bean id="serviceStrategy" class="${custom.strategy.class}"/>如果类在运行时无法变为有效。则这个bean会创建失败(当对非延迟实例化bean执行ApplicationContext的preInstantiateSingletons()方法的情况下)。 | |
另一个bean工厂后置处理器PropertyOverrideConfigurer类似于PropertyPlaceholderConfigurer。但是与后者相比,前者对于bean属性可以有缺省值或者根本没有值。如果起覆盖作用的Properties文件没有某个bean属性的内容,那么将使用缺省的上下文定义。
bean工厂并不会意识到被覆盖,所以仅仅察看XML定义文件并不能立刻知道覆盖配置是否被使用了。在多个PropertyOverrideConfigurer实例中对一个bean属性定义了不同的值时,最后定义的值将被使用(由于覆盖机制)。
Properties文件的配置应该是如下的格式:
beanName.property=value
An example properties file might look like this:
一个properties文件可能是下面这样的:
dataSource.driverClassName=com.mysql.jdbc.Driver
dataSource.url=jdbc:mysql:mydb
这个示例文件可用在这样一个bean容器:包含一个名为dataSource的bean,并且这个bean有driver和url属性。
注意它也支持组合的属性名称,只要路径中每个组件除了最后要被覆盖的属性外全都是非空的(比如通过构造器来初始化),在下例中:
foo.fred.bob.sammy=123
... the sammy property of the bob property of the fred property of the foo bean is being set to the scalar value 123.
foo bean的fred属性的bob属性的sammy属性被设置为数值123。
工厂bean需要实现org.springframework.beans.factory.FactoryBean接口。
FactoryBean接口是插入到Spring IoC容器用来定制实例化逻辑的一个接口点。如果你有一些复杂的初始化代码用Java可以更好来表示,而不是用(可能)冗长的XML,那么你就可以创建你自己的FactoryBean,并在那个类中写入复杂的初始化动作,然后把你定制的FactoryBean插入容器中。
FactoryBean接口提供三个方法:
Object getObject():返回一个由这个工厂创建的对象实例。这个实例可能被共享(取决于isSingleton()的返回值是singleton或prototype)。
boolean isSingleton():如果要让这个FactoryBean创建的对象实例为singleton则返回true,否则返回false。
Class getObjectType():返回通过getObject()方法返回的对象类型,如果该类型无法预料则返回null。
在Spring框架中FactoryBean的概念和接口被用于多个地方;在本文写作时,Spring本身提供的FactoryBean接口实现超过了50个。
最后,有时需要向容器请求一个真实的FactoryBean实例本身,而不是它创建的bean。这可以通过在FactoryBean(包括ApplicationContext)调用getBean方法时在bean id前加'&'(没有单引号)来完成。因此对于一个假定id为myBean的FactoryBean,在容器上调用getBean("myBean")将返回FactoryBean创建的bean实例,但是调用getBean("&myBean")将返回FactoryBean本身的实例。
beans包提供了以编程的方式管理和操控bean的基本功能,而context包下的ApplicationContext以一种更加面向框架的方式增强了BeanFactory的功能。多数用户可以采用声明的方式来使用ApplicationContext,甚至不用手动创建它,而通过ContextLoader这样的支持类,把它作为J2EE web应用的一部分自动启动。当然,我们仍然可以采用编程的方式创建一个ApplicationContext。
context包的核心是ApplicationContext接口。它由BeanFactory接口派生而来,因而提供了BeanFactory所有的功能。为了以一种更向面向框架的方式工作以及对上下文进行分层和实现继承,context包还提供了以下的功能:
MessageSource, 提供国际化的消息访问
资源访问,如URL和文件
事件传播,实现了ApplicationListener接口的bean
载入多个(有继承关系)上下文 ,使得每一个上下文都专注于一个特定的层次,比如应用的web层
简单的说:除非你有更好的理由,否则尽量使用ApplicationContext,下面是对于哪些"为什么"等等更深入的建议
ApplicationContext包含BeanFactory的所有功能。通常建议比BeanFactory优先,除非有一些限制的场合如字节长度对内存有很大的影响时(Applet)。然后,绝大多数"典型的"企业应用和系统,ApplicationContext就是你需要使用的。Spring2.0及以上版本,大量使用了link linkend="beans-factory-extension-bpp">BeanPostProcessor扩展(以便应用代理等功能),如果你选择BeanFactory则无法使用相当多的支持功能,如事务和AOP,这可能会导致混乱,因为配置并没有错误。
下面的功能矩阵列出了BeanFactory提供的功能和ApplicationContext提供的功能(包括其实现)。(下一节更深度的描述了ApplicationContext比BeanFactory更强的功能。)
ApplicationContext接口扩展了MessageSource接口,因而提供了消息处理的功能(i18n或者国际化)。与HierarchicalMessageSource一起使用,它还能够处理嵌套的消息,这些是Spring提供的处理消息的基本接口。让我们快速浏览一下它所定义的方法:
String getMessage(String code, Object[] args, String default, Locale loc):用来从MessageSource获取消息的基本方法。如果在指定的locale中没有找到消息,则使用默认的消息。args中的参数将使用标准类库中的MessageFormat来作消息中替换值。
String getMessage(String code, Object[] args, Locale loc):本质上和上一个方法相同,其区别在:没有指定默认值,如果没找到消息,会抛出一个NoSuchMessageException异常。
String getMessage(MessageSourceResolvable resolvable, Locale locale):上面方法中所使用的属性都封装到一个MessageSourceResolvable实现中,而本方法可以指定MessageSourceResolvable实现。
当一个ApplicationContext被加载时,它会自动在context中查找已定义为MessageSource类型的bean。此bean的名称须为messageSource。如果找到,那么所有对上述方法的调用将被委托给该bean。否则ApplicationContext会在其父类中查找是否含有同名的bean。如果有,就把它作为MessageSource。如果它最终没有找到任何的消息源,一个空的StaticMessageSource将会被实例化,使它能够接受上述方法的调用。
Spring目前提供了两个MessageSource的实现:ResourceBundleMessageSource和StaticMessageSource。它们都继承NestingMessageSource以便能够处理嵌套的消息。StaticMessageSource很少被使用,但能以编程的方式向消息源添加消息。ResourceBundleMessageSource会用得更多一些,为此提供了一下示例:
<beans>
  <bean id="messageSource"
        class="org.springframework.context.support.ResourceBundleMessageSource">
    <property name="basenames">
      <list>
        <value>format</value>
        <value>exceptions</value>
        <value>windows</value>
      </list>
    </property>
  </bean>
</beans>
这段配置假定在你的classpath中有三个资源文件(resource bundle),它们是format, exceptions和windows。通过ResourceBundle,使用JDK中解析消息的标准方式,来处理任何解析消息的请求。出于示例的目的,假定上面的两个资源文件的内容为…
# in 'format.properties'
message=Alligators rock!
# in 'exceptions.properties'
argument.required=The '{0}' argument is required.下面是测试代码。因为ApplicationContext实现也都实现了MessageSource接口,所以能被转型为MessageSource接口
public static void main(String[] args) {
    MessageSource resources = new ClassPathXmlApplicationContext("beans.xml");
    String message = resources.getMessage("message", null, "Default", null);
    System.out.println(message);
}
上述程序的输出结果将会是...
Alligators rock!
总而言之,我们在'beans.xml'的文件中(在classpath根目录下)定义了一个messageSource bean,通过它的basenames属性引用多个资源文件;而basenames属性值由list元素所指定的三个值传入,它们以文件的形式存在并被放置在classpath的根目录下(分别为format.properties,exceptions.properties和windows.properties)。
再分析个例子,这次我们将着眼于传递参数给查找的消息,这些参数将被转换为字符串并插入到已查找到的消息中的占位符(译注:资源文件中花括号里的数字即为占位符)。
<beans>

    <!-- this MessageSource is being used in a web application -->
    <bean id="messageSource" class="org.springframework.context.support.ResourceBundleMessageSource">
        <property name="baseName" value="WEB-INF/test-messages"/>
    </bean>

    <!-- let's inject the above MessageSource into this POJO -->
    <bean id="example" class="com.foo.Example">
        <property name="messages" ref="messageSource"/>
    </bean>

</beans>
public class Example {
private MessageSource messages;
public void setMessages(MessageSource messages) {
this.messages = messages;
}
public void execute() {
String message = this.messages.getMessage("argument.required",
new Object [] {"userDao"}, "Required", null);
System.out.println(message);
}
}调用execute()方法的输出结果是...
The 'userDao' argument is required.
对于国际化(i18n),Spring中不同的MessageResource实现与JDK标准ResourceBundle中的locale解析规则一样。比如在上面例子中定义的messageSource bean,如果你想解析British (en-GB) locale的消息,那么需要创建format_en_GB.properties,exceptions_en_GB.properties和windows_en_GB.properties三个资源文件。
Locale解析通常由应用程序根据运行环境来指定。出于示例的目的,我们对将要处理的(British)消息手工指定locale参数值。
# in 'exceptions_en_GB.properties'
argument.required=Ebagum lad, the '{0}' argument is required, I say, required.
public static void main(final String[] args) {
MessageSource resources = new ClassPathXmlApplicationContext("beans.xml");
String message = resources.getMessage("argument.required",
new Object [] {"userDao"}, "Required", Locale.UK);
System.out.println(message);
}上述程序运行时的输出结果是...
Ebagum lad, the 'userDao' argument is required, I say, required.
MessageSourceAware接口还能用于获取任何已定义的MessageSource引用。任何实现了MessageSourceAware接口的bean将在创建和配置的时候与MessageSource一同被注入。
ApplicationContext中的事件处理是通过ApplicationEvent类和ApplicationListener接口来提供的。如果在上下文中部署一个实现了ApplicationListener接口的bean,那么每当一个ApplicationEvent发布到ApplicationContext时,这个bean就得到通知。实质上,这是标准的Observer设计模式。Spring提供了三个标准事件:
Table 3.6. 内置事件
| 事件 | 解释 |
|---|---|
| ContextRefreshedEvent | 当ApplicationContext初始化或刷新时发送的事件。如使用ConfigurableApplicationContext接口的refresh()方法。这里的初始化意味着:所有的bean被装载,后处理bean被检测和激活,singleton被预实例化,以及ApplicationContext已就绪可用。刷新在context关闭会触发多次。选择ApplicationContext可以提供“热”刷新的功能(如:XmlWebApplicationContext 可以但是GenericApplicationContext 则不可以.) |
| ContextStartedEvent | 当ApplicationContext启动时发送的事件,使用ConfigurableApplicationContext接口的start()方法。这里"启动"意味着生命周期 beans将获得一个确实的启动信号。这经常使用在确实停止后重新启动的场合,但也可以用在启动一个没有被配置为自动启动的组件中(如:在完成初始化后还没有启动)。 |
| ContextStoppedEvent | 当使用ConfigurableApplicationContext接口的stop() 方法使ApplicationContext停止时候发送的事件。这里"停止"意味着生命周期 beans将获得一个确实的停止信号. 停止的context可以通过调用start()来重新启动。 |
| ContextClosedEvent | 当使用ConfigurableApplicationContext接口close() 方法使ApplicationContext 关闭时候发送的事件。 这里关闭意味着所有的singleton bean都被销毁。关闭的context不能刷新和重新启动。 |
| RequestHandledEvent | web特性的事件通告所有的bean有一个http request(将在request结束后才会发送)。注意这种事件只兼容于使用SpringDispatcherServlet兼容的web应用。 |
只要在ApplicationContext调用publishEvent()方法可以很方便的实现自定义事件,将一个实现了ApplicationEvent的自定义事件类作为参数就可以了。事件监听器同步的接收事件。这意味着publishEvent()方法将被阻塞,直到所有的监听器都处理完事件(可以通过一个ApplicationEventMulticaster的实现提供可选的事件发送策略)。此外,如果事务context可用,监听器会接收到一含有发送者事务context的事件。
看一个例子,首先是ApplicationContext:
<bean id="emailer" class="example.EmailBean">
  <property name="blackList">
    <list>
      <value>black@list.org</value>
      <value>white@list.org</value>
      <value>john@doe.org</value>
    </list>
  </property>
</bean>

<bean id="blackListListener" class="example.BlackListNotifier">
  <property name="notificationAddress" value="spam@list.org"/>
</bean>
再看一下实际的类:
public class EmailBean implements ApplicationContextAware {

    private List blackList;
	private ApplicationContext ctx;

    public void setBlackList(List blackList) {
        this.blackList = blackList;
    }

    public void setApplicationContext(ApplicationContext ctx) {
        this.ctx = ctx;
    }

    public void sendEmail(String address, String text) {
        if (blackList.contains(address)) {
            BlackListEvent event = new BlackListEvent(address, text);
            ctx.publishEvent(event);
            return;
        }
        // send email...
    }
}
public class BlackListNotifier implements ApplicationListener {
private String notificationAddress;
public void setNotificationAddress(String notificationAddress) {
this.notificationAddress = notificationAddress;
}
public void onApplicationEvent(ApplicationEvent event) {
if (event instanceof BlackListEvent) {
// notify appropriate person...
}
}
}当然,这个例子可以使用更好的方法实现(如采用AOP特性) ,但应该足以说明事件的基本机制。
为了更好的使用和理解应用上下文,通常用户应当对Spring的Resource有所了解,详见Chapter 4, 资源
应用上下文同时也是个资源加载器(ResourceLoader),能被用来加载多个Resource。一个Resource实质上可以当成一个java.net.URL,可被用来从大多数位置以透明的方式获取底层的资源,包括从classpath、文件系统位置、任何以标准URL描述的位置以及其它一些变种。如果资源位置串是一个没有任何前缀的简单路径,这些资源来自何处取决于实际应用上下文的类型。
为了让bean能访问静态资源,可以象其它属性一样注入Resource。被注入的Resource属性值可以是简单的路径字符串,ApplicationContext会使用已注册的PropertyEditor,来将字符串转换为实际的Resource对象。
ApplicationContext构造器的路径就是实际的资源串,根据不同的上下文实现,字符串可视为不同的形式(例如:ClassPathXmlApplicationContext会把路径字符串看作一个classpath路径)。然而,它也可以使用特定的前缀来强制地从classpath或URL加载bean定义文件,而不管实际的上下文类型。
与BeanFactory通常以编程的方式被创建不同的是,ApplicationContext能以声明的方式创建,如使用ContextLoader。当然你也可以使用ApplicationContext的实现之一来以编程的方式创建ApplicationContext实例。首先,让我们先分析ContextLoader接口及其实现。
ContextLoader机制有两种方式,ContextLoaderListener 和ContextLoaderServlet,他们功能相同但是listener不能在Servlet2.3容器下使用。Servlet2.4规范中servlet context listeners需要在web应用启动并能处理初始请求时立即运行。(servlet context listener关闭的时候也是相同的)。servlet context listener是初始化Spring ApplicationContext理想的方式。你可能愿意选择ContextLoaderListener,虽然是一样的,但决定权在于你。你可以查看ContextLoaderServlet的Javadoc来获得更详细的信息。
可以象下面所示例的一样使用ContextLoaderListener注册一个ApplicationContext
<context-param>
  <param-name>contextConfigLocation</param-name>
  <param-value>/WEB-INF/daoContext.xml /WEB-INF/applicationContext.xml</param-value>
</context-param>

<listener>
  <listener-class>org.springframework.web.context.ContextLoaderListener</listener-class>
</listener>

<!-- or use the ContextLoaderServlet instead of the above listener
<servlet>
  <servlet-name>context</servlet-name>
  <servlet-class>org.springframework.web.context.ContextLoaderServlet</servlet-class>
  <load-on-startup>1</load-on-startup>
</servlet>
-->
监听器首先检查contextConfigLocation参数,如果它不存在,它将使用/WEB-INF/applicationContext.xml作为默认值。如果已存在,它将使用分隔符(逗号、冒号或空格)将字符串分解成应用上下文件位置路径。可以支持ant-风格的路径模式,如/WEB-INF/*Context.xml(WEB-INF文件夹下所有以"Context.xml"结尾的文件)。或者/WEB-INF/**/*Context.xml(WEB-INF文件夹及子文件夹下的以"Context.xml"结尾的文件)。
ContextLoaderServlet同ContextLoaderListener一样使用'contextConfigLocation'参数。
一个应用中的大多数代码最好写成依赖注入(控制反转)的风格,这样代码就和Spring IoC容器无关,它们在被创建时从容器得到自己的依赖,并且完全不知道容器的存在。然而,对于少量需要与其它代码粘合的粘合层代码来说,有时候就需要以一种singleton(或者类似singleton)的方式来访问Spring IoC容器。例如,第三方的代码可能试图(以Class.forName()的方式)直接构造一个新的对象,但无法强制它们从Spring IoC容器中得到这些对象。如果第三方代码构造的对象只是一个小stub或proxy,并且使用singleton方式访问Spring IoC容器来获得真正的对象,那么大多数的代码(由容器产生的对象)仍然可以使用控制反转。因此大多数的代码依然不需要知道容器的存在,或者它如何被访问,并保持与其它代码的解耦,这样所带来的益处是很显然的。EJB也可以使用这种stub/proxy方案代理到由Spring IoC容器产生的普通的Java实现对象。虽然理想情况下Spring IoC容器不需要是singleton,但是如果每个bean使用它自己的non-singleton的Spring IoC容器(当在Spring IoC容器中使用bean时,如Hibernate SessionFactory),对于内存使用或初始化次数都是不切实际。
另一个例子,在一个多层的复杂的J2EE应用中(比如不同的JAR,EJB,以及WAR打包成一个EAR),每一层都有自己的Spring IoC容器定义(有效地组成一个层次结构),如果顶层只有一个web-app(WAR)的话,比较好的做法是简单地创建一个由不同层的XML定义文件组成的组合Spring IoC容器。所有不同的Spring IoC容器实现都可以以这种方式从多个定义文件构造出来。但是,如果在顶层有多个兄弟web-apps,为每一个web-app创建一个Spring IoC容器,而每个ApplicationContext都包含大部分相同的底层的bean定义。因而就会因内存使用,建bean的多个复本会花很长时间初始化(比如Hibernate SessionFactory),以及其它可能产生的副作用而产生问题。作为另一可选的方案,象ContextSingletonBeanFactoryLocator和SingletonBeanFactoryLocator的类可以在需要的时候以有效的singleton方式,加载多层次的(比如一个是另一个的父亲)Spring IoC容器,这些将会作为web应用的Spring IoC容器的父容器。由此底层的bean定义只在需要的时候加载(并且只被加载一次)。
你可以查看SingletonBeanFactoryLocator和ContextSingletonBeanFactoryLocator的JavaDoc来获得详细的例子。正如在EJB那章所提到的,Spring为EJB提供方便使用的基类,通常使用一个non-singleton的BeanFactoryLocator实现,这样在需要时就可以很容易地被SingletonBeanFactoryLocator和ContextSingletonBeanFactoryLocator替换。
自从Spring 2.5之后,我们就可以RAR文件的形式部署Spring ApplicationContext,该文件将应用上下文,所有需要的bean以及JARs文件封装到一个J2EE RAR部署单元中。这与引导启动一个独立的 ApplicationContext 是一样的,只是它要寄居于J2EE环境内,以便能够访问J2EE服务器提供的基本功能。这种RAR的部署对于那些常见的应用场景准备以一种更加“自然”的方式去部署一个没有头(headless)的WAR文件——就是说:一个没有任何HTTP入口点,而只用于在J2EE环境中启动一个Spring ApplicationContext的WAR文件。
RAR部署对于那些不需要任何HTTP入口点而仅包含消息节点与任务安排等的应用上下文来说非常理想。在这样的上下文中的Beans可以使用应用服务器资源,例如JTA事务管理,绑定到JNDI的JDBC数据源,JMS ConnectionFactory实例,同时这些beans还可以注册到平台上的JMX服务器——所有这些都通过Spring标准的事务管理与JNDI以及JMX支持的功能来实现的。应用组件也可以通过Spring的TaskExecutor 接口与应用服务器的JCA WorkManager进行交互。
查看SpringContextResourceAdapter类的JavaDoc,以了解关于RAR部署的配置细节。
对于简单的部署,您要做的事情如下:将所有应用类打包成RAR文件(此文件是标准的 JAR 文件,只是扩展名不同),将所有需要的jars包添加到该RAR文件的根目录中,添加一个”META-INF/ra.xml“部署描述符(参见SpringContextResourceAdapter的JavaDoc)及相应的Spring XML bean定义文件(典型情况下为"META-INF/applicationContext.xml")最后把这个 RAR 文件放到您的应用服务器的部署目录中!
注意:这个RAR部署单元一般是自包含的;他们没有将组件暴露给“外部”世界,甚至也没有暴露给应用中的其他模块。我们一般使用JMS(多个模块共享)与基于RAR的ApplicationContext进行交互。例如调度任务,对新加入文件系统的文件作出反应(或者类似的)。实际上,如果需要考虑到外界的同步访问,它可以导出RMI端点,这个过程也同样适用于同一台机器上的其他应用模块。
在Section 3.7.1.2, “RequiredAnnotationBeanPostProcessor示例”一节中我们提到了基于注解的配置方式,使用BeanPostProcessor与注解是 Spring IoC 容器的一个普通扩展方法。例如,Spring 2.0 对必须的属性引入了@Required注解。在 Spring 2.5中已经可以用注解的方式去驱动 Spring 的依赖注射了。更重要的是,@Autowired注解提供了与Section 3.3.5, “自动装配(autowire)协作者”一节中描述的同样功能,并且提供了更细致的控制与更好的适应性。Spring 2.5 也支持 JSR-250 中的一些注解,例如@Resource,@PostConstruct,以及@PreDestroy。当然,要使注解可用,您必须使用 Java 5 (Tiger)或更新的版本,以使得可以访问源代码层次的注解。这些注解可以被注册为独立 bean 的定义,但它们也可以被隐式地注册,通过基于 XML 的配置方式,如下例(请注意包含 'context' 命名空间):
<?xml version="1.0" encoding="UTF-8"?>
<beans xmlns="http://www.springframework.org/schema/beans"
       xmlns:xsi="http://www.w3.org/2001/XMLSchema-instance"
       xmlns:context="http://www.springframework.org/schema/context"
       xsi:schemaLocation="http://www.springframework.org/schema/beans
           http://www.springframework.org/schema/beans/spring-beans-2.5.xsd
           http://www.springframework.org/schema/context
           http://www.springframework.org/schema/context/spring-context-2.5.xsd">

     <context:annotation-config/>

</beans>
(隐式注册 post-processors 包括了 AutowiredAnnotationBeanPostProcessor,CommonAnnotationBeanPostProcessor,PersistenceAnnotationBeanPostProcessor,也包括了前面提到的 RequiredAnnotationBeanPostProcessor。)
@Autowired 注解可以用于“传统的”setter 方法,如下例:
public class SimpleMovieLister {

    private MovieFinder movieFinder;

    @Autowired
    public void setMovieFinder(MovieFinder movieFinder) {
        this.movieFinder = movieFinder;
    }

    // ...
}
这个注解也可以用于以属性为参数/多个参数的方法
public class MovieRecommender {

    private MovieCatalog movieCatalog;

    private CustomerPreferenceDao customerPreferenceDao;

    @Autowired
    public void prepare(MovieCatalog movieCatalog, CustomerPreferenceDao customerPreferenceDao) {
        this.movieCatalog = movieCatalog;
        this.customerPreferenceDao = customerPreferenceDao;
    }

    // ...
}@Autowired注解甚至可以用于构造器与字段:
public class MovieRecommender {

    @Autowired
    private MovieCatalog movieCatalog;

    private CustomerPreferenceDao customerPreferenceDao;

    @Autowired
    public MovieRecommender(CustomerPreferenceDao customerPreferenceDao) {
        this.customerPreferenceDao = customerPreferenceDao;
    }

    // ...
}也可以一种提供来自ApplicationContext的特殊类型的所有 beans,注解字段或者方法,例如:
public class MovieRecommender {

    @Autowired
    private MovieCatalog[] movieCatalogs;

    // ...
}
这同样适用于集合类型:
public class MovieRecommender {

    private Set<MovieCatalog> movieCatalogs;

    @Autowired
    public void setMovieCatalogs(Set<MovieCatalog> movieCatalogs) {
        this.movieCatalogs = movieCatalogs;
    }

    // ...
}
甚至是 Maps 也可以这样注解,只要这个 Map 的 key 类型为 String。这个 Map 的 values 应该是已知的类型,并且 keys 应该包含符合 bean 的命名:
public class MovieRecommender {

    private Map<String, MovieCatalog> movieCatalogs;

    @Autowired
    public void setMovieCatalogs(Map<String, MovieCatalog> movieCatalogs) {
        this.movieCatalogs = movieCatalogs;
    }

    // ...
}在缺省情况下,当出现0个候选的 beans时自动连接将失败;缺省行为把连接方法,构造器,字段假设为 required 的依赖。这样的行为如下所示:
public class SimpleMovieLister {

    private MovieFinder movieFinder;

    @Autowired(required=false)
    public void setMovieFinder(MovieFinder movieFinder) {
        this.movieFinder = movieFinder;
    }

    // ...
} | Note |
|---|---|
虽然当 一个类只有一个连接构造器时它将被标记为 required, 但是还是可以标记多个构造器的。在这种情况下,每一个构造器都有可能被认为是连接构造器, Spring 将会把依赖关系能够满足的构造器认为是greediest 的构造器。 | |
@Autowired也能用于总所周知的“可解决的依赖”:BeanFactory接口,ApplicationContext接口,ResourceLoader接口,ApplicationEventPublisher接口,还有MessageSource接口。这些接口(还有它们的扩展,例如ConfigurableApplicationContext或者ResourcePatternResolver)将可以自动解决依赖,没有任何特殊必须的其它步骤需要。
public class MovieRecommender {

    @Autowired
    private ApplicationContext context;

    public MovieRecommender() {
    }

    // ...
}因为通过类型的自动连接可能会有多个候选,因此经常需要在选择过程中加以控制。一种方法去完成这个控制就是使用@Qualifier注解。在最简单的情况下,您能够通过命名方式去实现这个自动连接:
public class MovieRecommender {

    @Autowired
    @Qualifier("mainCatalog")
    private MovieCatalog movieCatalog;

    // ...
}@Qualifier注解也能够被指定为构造器的参数或者方法的参数:
public class MovieRecommender {

    private MovieCatalog movieCatalog;

    private CustomerPreferenceDao customerPreferenceDao;

    @Autowired
    public void prepare(@Qualifier("mainCatalog") MovieCatalog movieCatalog, CustomerPreferenceDao customerPreferenceDao) {
        this.movieCatalog = movieCatalog;
        this.customerPreferenceDao = customerPreferenceDao;
    }

    // ...
}您也可以创建您自定义的限定器注解。您只要在定义一个注解时提供@Qualifier注解就可以了:
@Target({ElementType.FIELD, ElementType.PARAMETER})
@Retention(RetentionPolicy.RUNTIME)
@Qualifier
public @interface Genre {

    String value();

}
然后您就能够将这个自定义的限定器与参数用于自动连接的字段:
public class MovieRecommender {

    @Autowired
    @Genre("Action")
    private MovieCatalog actionCatalog;

    private MovieCatalog comedyCatalog;

    @Autowired
    public void setComedyCatalog(@Genre("Comedy") MovieCatalog comedyCatalog) {
        this.comedyCatalog = comedyCatalog;
    }

    // ...
}
下一步就是提供信息给候选的 bean 的定义。您能够添加<qualifier/>标签作为<bean/>标签的子元素,然后指定'type'还有'value'以匹配您的自定义限定器注解。类型必须匹配注解的全名,或者是一个不危险的、方便一点的名字,您也可以使用“短” 类名。参看下例:
<?xml version="1.0" encoding="UTF-8"?>
<beans xmlns="http://www.springframework.org/schema/beans"
    xmlns:xsi="http://www.w3.org/2001/XMLSchema-instance"
    xmlns:context="http://www.springframework.org/schema/context"
    xsi:schemaLocation="
        http://www.springframework.org/schema/beans http://www.springframework.org/schema/beans/spring-beans-2.5.xsd
        http://www.springframework.org/schema/context http://www.springframework.org/schema/context/spring-context-2.5.xsd">

    <context:annotation-config/>

    <bean class="example.SimpleMovieCatalog">
        <qualifier type="Genre" value="Action"/>
        <!-- inject any dependencies required by this bean -->
    </bean>

    <bean class="example.SimpleMovieCatalog">
        <qualifier type="example.Genre" value="Comedy"/>
        <!-- inject any dependencies required by this bean -->
    </bean>

    <bean id="movieRecommender" class="example.MovieRecommender"/>

</beans>
在下一节,题目是Section 3.12, “对受管组件的Classpath扫描”,您将看到使用XML提供给限定器元数据且基于注解的可选解决方案。特别地,请参看:Section 3.12.6, “用注解提供限定符元数据”。
在某些情况下,有足够充分的理由去使用不带值的注解。这使得注解可以提供更多解决不同类型依赖的能力。例如,在 Internet 连接不可用时,您可以提供一个离线的搜索目录。首先就要定义一个简单的注解:
@Target({ElementType.FIELD, ElementType.PARAMETER})
@Retention(RetentionPolicy.RUNTIME)
@Qualifier
public @interface Offline {

}
然后添加这个注解给字段作为自动连接:
public class MovieRecommender {

    @Autowired
    @Offline
    private MovieCatalog offlineCatalog;

    // ...
}
现在,这个 bean 的定影只组要一个限定器了:
<bean class="example.SimpleMovieCatalog">
    <qualifier type="Offline"/>
    <!-- inject any dependencies required by this bean -->
</bean>另外,也可以定制自己的限定器注解去使用命名的属性或者简单的'value'属性。如果自动连接时多个属性值被指定给了一个字段或者参数,那么一个 bean 的定义必须全部匹配这些属性的值。例如,考虑如下的注解定义:
@Target({ElementType.FIELD, ElementType.PARAMETER})
@Retention(RetentionPolicy.RUNTIME)
@Qualifier
public @interface MovieQualifier {

    String genre();

    Format format();

}在这种情况下,Format是一个枚举:
public enum Format {

    VHS, DVD, BLURAY
}这些字段将与自定义的限定器进行自动连接,包括了每个属性的值:'genre' 以及 'format'。
public class MovieRecommender {

    @Autowired
    @MovieQualifier(format=Format.VHS, genre="Action")
    private MovieCatalog actionVhsCatalog;

    @Autowired
    @MovieQualifier(format=Format.VHS, genre="Comedy")
    private MovieCatalog comedyVhsCatalog;

    @Autowired
    @MovieQualifier(format=Format.DVD, genre="Action")
    private MovieCatalog actionDvdCatalog;

    @Autowired
    @MovieQualifier(format=Format.BLURAY, genre="Comedy")
    private MovieCatalog comedyBluRayCatalog;

    // ...
}
最终,这个 bean 的定义应该与限定器匹配的值。这个列子将说明bean 的元属性可以用于替代<qualifier/>的子元素。那样的话,<qualifier/>以及它的属性将优先考虑,但是如果没有限定器的话(参看如下定义的后两个 bean ),自动连接机制将取消以<meta/>标签标记的值。
<?xml version="1.0" encoding="UTF-8"?>
<beans xmlns="http://www.springframework.org/schema/beans"
    xmlns:xsi="http://www.w3.org/2001/XMLSchema-instance"
    xmlns:context="http://www.springframework.org/schema/context"
    xsi:schemaLocation="
        http://www.springframework.org/schema/beans http://www.springframework.org/schema/beans/spring-beans-2.5.xsd
        http://www.springframework.org/schema/context http://www.springframework.org/schema/context/spring-context-2.5.xsd">

    <context:annotation-config/>

    <bean class="example.SimpleMovieCatalog">
        <qualifier type="MovieQualifier">
            <attribute name="format" value="VHS"/>
            <attribute name="genre" value="Action"/>
        </qualifier>
        <!-- inject any dependencies required by this bean -->
    </bean>

    <bean class="example.SimpleMovieCatalog">
        <qualifier type="MovieQualifier">
            <attribute name="format" value="VHS"/>
            <attribute name="genre" value="Comedy"/>
        </qualifier>
        <!-- inject any dependencies required by this bean -->
    </bean>

    <bean class="example.SimpleMovieCatalog">
        <meta key="format" value="DVD"/>
        <meta key="genre" value="Action"/>
        <!-- inject any dependencies required by this bean -->
    </bean>

    <bean class="example.SimpleMovieCatalog">
        <meta key="format" value="BLURAY"/>
        <meta key="genre" value="Comedy"/>
        <!-- inject any dependencies required by this bean -->
    </bean>

</beans>CustomAutowireConfigurer是一个BeanFactoryPostProcessor,它可以使得在自动连接过程中做更多的自定义选择。特殊地,它允许您注册您自己的自定义限定器注解类型,甚至是它们没有使用 Spring 的@Qualifier注解标注它们自己。
<bean id="customAutowireConfigurer" class="org.springframework.beans.factory.annotation.CustomAutowireConfigurer">
    <property name="customQualifierTypes">
        <set>
            <value>example.CustomQualifier</value>
        </set>
    </property>
</bean>请注意,AutowireCandidateResolver的实现将依赖于 Java 版本。如果在 Java 5 以下,限定器注解是不被支持的,因此自动连接后选将被'autowire-candidate'的值或者在<beans/>中元素'default-autowire-candidates'可用的模式所决定。如果运行在 Java 5 或者更新的版本上,@Qualifier注解或者任何自定义并在CustomAutowireConfigurer上注册过的注解都将正常工作。
忽略 Java 版本,决定“主要”的后选(当多个 beans 都配置为自动连接后选时)都是一样的:在这些后选中只要一个 bean 的'primary'属性定义为'true'即可。
Spring 也提供了使用 JSR-250 bean 属性支持的注射方式。这是一种在 Java EE 5 与 Java 6 中普遍使用的方式(例如,在 JSF 1.2 中映射 beans 或者 JAX-WS 2.0 端点),对于Spring 托管的对象 Spring 可以以这种方式支持映射。
@Resource有一个‘name’属性,缺省时,Spring 将这个值解释为要注射的 bean 的名字。换句话说,如果遵循by-name的语法,如下例:
public class SimpleMovieLister {

    private MovieFinder movieFinder;

    @Resource(name="myMovieFinder")
    public void setMovieFinder(MovieFinder movieFinder) {
        this.movieFinder = movieFinder;
    }
}
如果没有显式地给出名字,缺省的名字将继承于字段名或者 setter 方法名:如果是字段名,它将简化或者等价于字段名;如果是 setter 方法名,它将等价于 bean 属性名。下面这个例子使用名字 "movieFinder" 注射到它的 setter 方法:
public class SimpleMovieLister {

    private MovieFinder movieFinder;

    @Resource
    public void setMovieFinder(MovieFinder movieFinder) {
        this.movieFinder = movieFinder;
    }
} | Note |
|---|---|
注解提供的名字将被BeanFactory解析为 bean 名。请注意,这些名字也可能通过 JNDI 被解析(需要配置 Spring 的SimpleJndiBeanFactory)。不过,建议您依靠缺省行为与 Spring 的 JNDI 查找功能。 | |
与@Autowired类似,@Resource可以回退为与标准 bean 类型匹配(例如,使用原始类型匹配取代特殊命名 bean)来解决著名的"resolvable dependencies":BeanFactory 接口,ApplicationContext 接口,ResourceLoader 接口,ApplicationEventPublisher 接口以及 MessageSource 接口。请注意:这只有适用于未指定命名的@Resource!
下面的例子有一个customerPreferenceDao字段,首先要查找一个名叫 “customerPreferenceDao” 的 bean,然后回退为一个原始类型以匹配类型CustomerPreferenceDao。"context" 字段将基于已知解决的依赖类型ApplicationContext而被注入。
public class MovieRecommender {

    @Resource
    private CustomerPreferenceDao customerPreferenceDao;

    @Resource
    private ApplicationContext context;

    public MovieRecommender() {
    }

    // ...
}CommonAnnotationBeanPostProcessor 不只是能识别@Resource注解,而且也能识别 JSR-250 lifecycle注解。在 Spring 2.5 中,这些注解的描述请参看initialization callbacks 与 destruction callbacks节。CommonAnnotationBeanPostProcessor已经在 Spring 的ApplicationContext中注册,当一个方法带有这些注解之一时,将被在其生命周期与 Spring 生命周期接口的方法或者显式声明回调方法同一刻上调用。下面的例子里,缓存将预置于初始化与销毁阶段。
public class CachingMovieLister {

    @PostConstruct
    public void populateMovieCache() {
        // populates the movie cache upon initialization...
    }

    @PreDestroy
    public void clearMovieCache() {
        // clears the movie cache upon destruction...
    }
} | Note |
|---|---|
关于组合不同的生命周期机制,请查看Section 3.5.1.4, “组合生命周期机制”。 | |
到目前为止本章中的大多数例子都使用XML来指定配置元数据, 这些元数据会生成Spring容器中的每个BeanDefinition。 上一节(Section 3.11, “基于注解(Annotation-based)的配置”)演示了如何使用代码级注解来提供大量配置元数据。 然而,即使是在那些例子中,“基础”bean定义还是显式地定义在XML文件中,注解只是用来驱动依赖注入的。 本节中会介绍一种方法,通过扫描classpath并匹配过滤器来隐式地检测候选组件 (candidate components)。
从Spring 2.0开始,引入了@Repository注解, 用它来标记充当储存库(又称 Data Access Object或DAO)角色或典型的类。利用这个标记可以做很多事, 其中之一就是对Section 12.6.4, “异常转化”中描述的异常进行自动转换。
Spring 2.5引入了更多典型化注解(stereotype annotations): @Component、@Service和 @Controller。 @Component是所有受Spring管理组件的通用形式; 而@Repository、@Service和 @Controller则是@Component的细化, 用来表示更具体的用例(例如,分别对应了持久化层、服务层和表现层)。也就是说, 你能用@Component来注解你的组件类, 但如果用@Repository、@Service 或@Controller来注解它们,你的类也许能更好地被工具处理,或与切面进行关联。 例如,这些典型化注解可以成为理想的切入点目标。当然,在Spring Framework以后的版本中, @Repository、@Service和 @Controller也许还能携带更多语义。如此一来,如果你正在考虑服务层中是该用 @Component还是@Service, 那@Service显然是更好的选择。同样的,就像前面说的那样, @Repository已经能在持久化层中进行异常转换时被作为标记使用了。
Spring可以自动检测“被典型化”(stereotyped)的类,在ApplicationContext 中注册相应的BeanDefinition。例如,下面的这两个类就满足这种自动检测的要求:
@Service
public class SimpleMovieLister {

    private MovieFinder movieFinder;

    @Autowired
    public SimpleMovieLister(MovieFinder movieFinder) {
        this.movieFinder = movieFinder;
    }
}
@Repository
public class JpaMovieFinder implements MovieFinder {
// implementation elided for clarity
}要检测这些类并注册相应的bean,需要在XML中包含以下元素,其中'basePackage'是两个类的公共父包 (或者可以用逗号分隔的列表来分别指定包含各个类的包)。
<?xml version="1.0" encoding="UTF-8"?>
<beans xmlns="http://www.springframework.org/schema/beans"
       xmlns:xsi="http://www.w3.org/2001/XMLSchema-instance"
       xmlns:context="http://www.springframework.org/schema/context"
       xsi:schemaLocation="http://www.springframework.org/schema/beans
           http://www.springframework.org/schema/beans/spring-beans-2.5.xsd
           http://www.springframework.org/schema/context
           http://www.springframework.org/schema/context/spring-context-2.5.xsd">

     <context:component-scan base-package="org.example"/>

</beans>此外,在使用组件扫描元素时,AutowiredAnnotationBeanPostProcessor 和CommonAnnotationBeanPostProcessor会隐式地被包括进来。 也就是说,连个组件都会被自动检测并织入 - 所有这一切都不需要在XML中提供任何bean配置元数据。
| Note |
|---|---|
通过加入值为'false'的annotation-config属性可以禁止注册这些后置处理器。 | |
默认情况下,用@Component、 @Repository、@Service或 @Controller (或本身使用了@Component注解的自定义注解) 注解的类是唯一会被检测到的候选组件。但是可以很方便地通过自定义过滤器来改变并扩展这一行为。 可以用'component-scan'的include-filter或 exclude-filter子元素来进行添加。 每个过滤器元素都要求有'type'和'expression'属性。 下面给出了四个已有的可选过滤器。
Table 3.7. 过滤器类型
| 过滤器类型 | 表达式范例 |
|---|---|
| annotation | org.example.SomeAnnotation |
| assignable | org.example.SomeClass |
| regex | org\.example\.Default.* |
| aspectj | org.example..*Service+ |
下面这个XML配置会忽略所有的@Repository注解并用“stub”储存库代替。
<beans ...>

     <context:component-scan base-package="org.example">
        <context:include-filter type="regex" expression=".*Stub.*Repository"/>
        <context:exclude-filter type="annotation" expression="org.springframework.stereotype.Repository"/>
     </context:component-scan>

</beans> | Note |
|---|---|
你也可以用<component-scan/>元素的use-default-filters="false" 属性来禁用默认的过滤器。这会关闭对使用了@Component、 @Repository、@Service或 @Controller的类的自动检测。 | |
当一个组件在某个扫描过程中被自动检测到时,会根据那个扫描器的BeanNameGenerator 策略生成它的bean名称。默认情况下,任何包含name值的Spring“典型”注解 (@Component、@Repository、 @Service和@Controller) 会把那个名字提供给相关的bean定义。如果这个注解不包含name值或是其他检测到的组件 (比如被自定义过滤器发现的),默认bean名称生成器会返回小写开头的非限定(non-qualified)类名。 例如,如果发现了下面这两个组件,它们的名字会是'myMovieLister'和'movieFinderImpl':
@Service("myMovieLister")
public class SimpleMovieLister {
    // ...
}
@Repository
public class MovieFinderImpl implements MovieFinder {
// ...
} | Note |
|---|---|
如果你不想使用默认bean命名策略,可以提供一个自定义的命名策略。首先实现 BeanNameGenerator 接口,确认包含了一个默认的无参数构造方法。然后在配置扫描器时提供一个全限定(fully-qualified)类名: | |
<beans ...>
<context:component-scan base-package="org.example"
name-generator="org.example.MyNameGenerator" />
</beans>作为一条常规,当其他组件可能会显式地引用一个组件时可以考虑用注解来指定名称。 另一方面,当容器负责织入时,自动生成的名称就足够了。
通常受Spring管理的组件,默认或者最常用的作用域是“singleton”。然而,有时也会需要其他的作用域。 因此Spring 2.5还引入了一个新的@Scope注解。只要在注解中提供作用域的名称就行了, 比方说:
@Scope("prototype")
@Repository
public class MovieFinderImpl implements MovieFinder {
    // ...
} | Note |
|---|---|
如果你想提供一个自定义的作用域解析策略,不使用基于注解的方法,实现ScopeMetadataResolver 接口,确认包含一个默认的没有参数的构造方法。然后在配置扫描器时提供全限定类名: | |
<beans ...>

     <context:component-scan base-package="org.example"
                             scope-resolver="org.example.MyScopeResolver" />

</beans>
当使用某些非singleton的作用域时,可能需要为这些作用域中的对象生成代理。 原因在标题为Section 3.4.4.5, “作用域bean与依赖”的章节中已经说过了。 为了这个目的,'component-scan'元素有一个scoped-proxy属性。 三个可能值是:'no'、'interfaces'和'targetClass'。比方说,下面的配置会产生标准的JDK动态代理:
<beans ...>

     <context:component-scan base-package="org.example"
                             scoped-proxy="interfaces" />

</beans>在名为Section 3.11.2, “基于注解的自动连接微调”的章节里引入了@Qualifier注解。 那节的例子中演示了@Qualifier注解的用法,以及如何用自定义限定符注解在自动织入解析时提供精细控制。 那些例子是基于XML bean定义的,所以限定符元数据是在XML中由'bean'元素的 'qualifier'或'meta'子元素提供。使用classpath扫描来自动检测组件时, 限定符元数据可以由候选类上的类别级(type-level)注解来提供。下面的三个例子就演示了这个技术。
@Component
@Qualifier("Action")
public class ActionMovieCatalog implements MovieCatalog {
    // ...
}
@Component
@Genre("Action")
public class ActionMovieCatalog implements MovieCatalog {
    // ...
}
@Component
@Offline
public class CachingMovieCatalog implements MovieCatalog {
    // ...
}
| Note |
|---|---|
| 和其他大多数基于注解的东西一样,请牢记注解元数据是绑定到类定义上的, 而XML则允许多个相同类型的bean根据限定符元数据提供多种选择, 因为元数据是由每个实例提供的,而不是每个类。 | |
Spring 2.5引入的context名字空间提供了一个load-time-weaver元素。
<beans ...>

     <context:load-time-weaver/>

</beans>在一个基于XML的Spring配置文件中加入这个元素能为ApplicationContext 激活一个Spring LoadTimeWeaver。 那个ApplicationContext中的任何bean都可以实现 LoadTimeWeaverAware,从而收到一个加载时织入器(load-time weaver)的实例。 这在与Spring JPA支持结合时特别有用,JPA类转换需要加载时织入。 请查看LocalContainerEntityManagerFactoryBean的Javadoc以获得详细信息。 想要更多地了解AspectJ加载时织入的话,请参考Section 6.8.4, “在Spring应用中使用AspectJ加载时织入(LTW)”。