34.5. Adding a Novell NetWare (NCP) Printer
To add a Novell NetWare (NCP) printer, click the New button in the main Printer Configuration Tool window. The window shown in Figure 34-1 appears. Click Forward to proceed.
In the window shown in Figure 34-3, enter a unique name for the printer in the Name text field. The printer name cannot contain spaces and must begin with a letter. The printer name may contain letters, numbers, dashes (-), and underscores (_). Optionally, enter a short description for the printer, which can contain spaces.
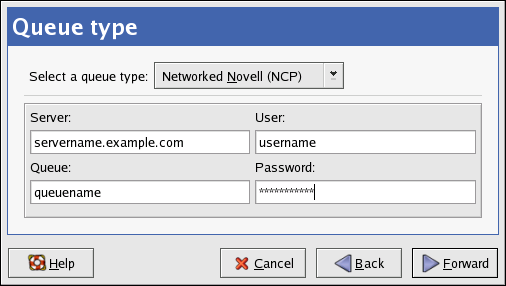
Select Networked Novell (NCP) from the Select a queue type menu.
Text fields for the following options appear:
Server — The hostname or IP address of the NCP system to which the printer is attached.
Queue — The remote queue for the printer on the NCP system.
User — The name of the user you must log in as to access the printer.
Password — The password for the user specified in the User field above.
Next, select the printer type. Refer to Section 34.7 Selecting the Printer Model and Finishing for details.
 | Warning |
|---|---|
If you require a username and password, they are stored unencrypted in files only readable by root and lpd. Thus, it is possible for others to learn the username and password if they have root access. To avoid this, the username and password to access the printer should be different from the username and password used for the user's account on the local Red Hat Enterprise Linux system. If they are different, then the only possible security compromise would be unauthorized use of the printer. If there are file shares from the server, it is recommended that they also use a different password than the one for the print queue. |