22.3. Exporting NFS File Systems
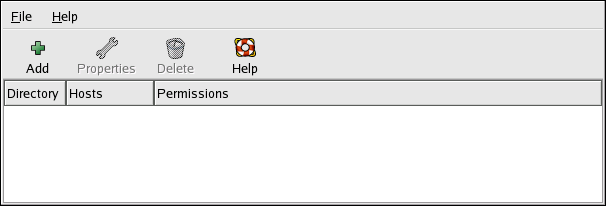
Sharing or serving files from an NFS server is known as exporting the directories. The NFS Server Configuration Tool can be used to configure a system as an NFS server.
To use the NFS Server Configuration Tool, you must be running the X Window System, have root privileges, and have the system-config-nfs RPM package installed. To start the application, select the Main Menu Button (on the Panel) => System Settings => Server Settings => NFS, or type the command system-config-nfs.
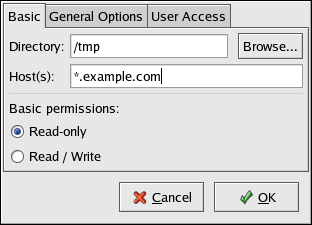
To add an NFS share, click the Add button. The dialog box shown in Figure 22-2 appears.
The Basic tab requires the following information:
Directory — Specify the directory to share, such as /tmp.
Host(s) — Specify the host(s) with which to share the directory. Refer to Section 22.3.2 Hostname Formats for an explanation of possible formats.
Basic permissions — Specify whether the directory should have read-only or read/write permissions.
The General Options tab allows the following options to be configured:
Allow connections from port 1024 and higher — Services started on port numbers less than 1024 must be started as root. Select this option to allow the NFS service to be started by a user other than root. This option corresponds to insecure.
Allow insecure file locking — Do not require a lock request. This option corresponds to insecure_locks.
Disable subtree checking — If a subdirectory of a file system is exported, but the entire file system is not exported, the server checks to see if the requested file is in the subdirectory exported. This check is called subtree checking. Select this option to disable subtree checking. If the entire file system is exported, selecting to disable subtree checking can increase the transfer rate. This option corresponds to no_subtree_check.
Sync write operations on request — Enabled by default, this option does not allow the server to reply to requests before the changes made by the request are written to the disk. This option corresponds to sync. If this is not selected, the async option is used.
Force sync of write operations immediately — Do not delay writing to disk. This option corresponds to no_wdelay.
The User Access tab allows the following options to be configured:
Treat remote root user as local root — By default, the user and group IDs of the root user are both 0. Root squashing maps the user ID 0 and the group ID 0 to the user and group IDs of anonymous so that root on the client does not have root privileges on the NFS server. If this option is selected, root is not mapped to anonymous, and root on a client has root privileges to exported directories. Selecting this option can greatly decrease the security of the system. Do not select it unless it is absolutely necessary. This option corresponds to no_root_squash.
Treat all client users as anonymous users — If this option is selected, all user and group IDs are mapped to the anonymous user. This option corresponds to all_squash.
Specify local user ID for anonymous users — If Treat all client users as anonymous users is selected, this option lets you specify a user ID for the anonymous user. This option corresponds to anonuid.
Specify local group ID for anonymous users — If Treat all client users as anonymous users is selected, this option lets you specify a group ID for the anonymous user. This option corresponds to anongid.
To edit an existing NFS share, select the share from the list, and click the Properties button. To delete an existing NFS share, select the share from the list, and click the Delete button.
After clicking OK to add, edit, or delete an NFS share from the list, the changes take place immediately — the server daemon is restarted and the old configuration file is saved as /etc/exports.bak. The new configuration is written to /etc/exports.
The NFS Server Configuration Tool reads and writes directly to the /etc/exports configuration file. Thus, the file can be modified manually after using the tool, and the tool can be used after modifying the file manually (provided the file was modified with correct syntax).
22.3.1. Command Line Configuration
If you prefer editing configuration files using a text editor or if you do not have the X Window System installed, you can modify the configuration file directly.
The /etc/exports file controls what directories the NFS server exports. Its format is as follows:
directory hostname(options) |
The only option that needs to be specified is one of sync or async (sync is recommended). If sync is specified, the server does not reply to requests before the changes made by the request are written to the disk.
For example,
/misc/export speedy.example.com(sync) |
would allow users from speedy.example.com to mount /misc/export with the default read-only permissions, but,
/misc/export speedy.example.com(rw,sync) |
would allow users from speedy.example.com to mount /misc/export with read/write privileges.
Refer to Section 22.3.2 Hostname Formats for an explanation of possible hostname formats.
Refer to the Red Hat Enterprise Linux Reference Guide for a list of options that can be specified.
 | Caution | |
|---|---|---|
Be careful with spaces in the /etc/exports file. If there are no spaces between the hostname and the options in parentheses, the options apply only to the hostname. If there is a space between the hostname and the options, the options apply to the rest of the world. For example, examine the following lines:
The first line grants users from speedy.example.com read-write access and denies all other users. The second line grants users from speedy.example.com read-only access (the default) and allows the rest of the world read-write access. |
Each time you change /etc/exports, you must inform the NFS daemon of the change, or reload the configuration file with the following command:
/sbin/service nfs reload |
22.3.2. Hostname Formats
The host(s) can be in the following forms:
Single machine — A fully qualified domain name (that can be resolved by the server), hostname (that can be resolved by the server), or an IP address.
Series of machines specified with wildcards — Use the * or ? character to specify a string match. Wildcards are not to be used with IP addresses; however, they may accidentally work if reverse DNS lookups fail. When specifying wildcards in fully qualified domain names, dots (.) are not included in the wildcard. For example, *.example.com includes one.example.com but does not include one.two.example.com.
IP networks — Use a.b.c.d/z, where a.b.c.d is the network and z is the number of bits in the netmask (for example 192.168.0.0/24). Another acceptable format is a.b.c.d/netmask, where a.b.c.d is the network and netmask is the netmask (for example, 192.168.100.8/255.255.255.0).
Netgroups — In the format @group-name, where group-name is the NIS netgroup name.
22.3.3. Starting and Stopping the Server
On the server that is exporting NFS file systems, the nfs service must be running.
View the status of the NFS daemon with the following command:
/sbin/service nfs status |
Start the NFS daemon with the following command:
/sbin/service nfs start |
Stop the NFS daemon with the following command:
/sbin/service nfs stop |
To start the nfs service at boot time, use the command:
/sbin/chkconfig --level 345 nfs on |
You can also use chkconfig, ntsysv or the Services Configuration Tool to configure which services start at boot time. Refer to Chapter 20 Controlling Access to Services for details.