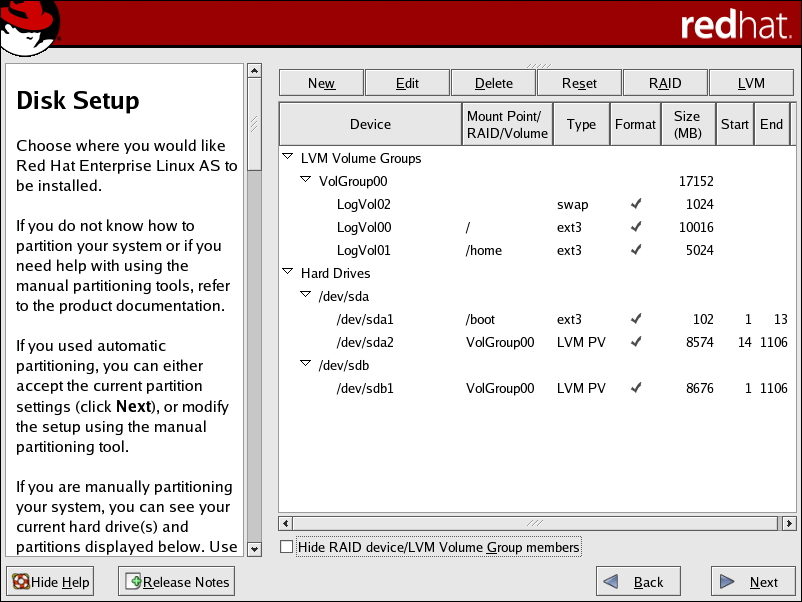
8.2. Manual LVM Partitioning
The following section explains how to manually configure LVM for Red Hat Enterprise Linux. Because there are numerous ways to manually configure a system with LVM, the following example is similar to the default configuration done in Section 8.1 Automatic Partitioning.
On the Disk Partitioning Setup screen, select Manually partition with Disk Druid.
8.2.1. Creating the /boot/ Partition
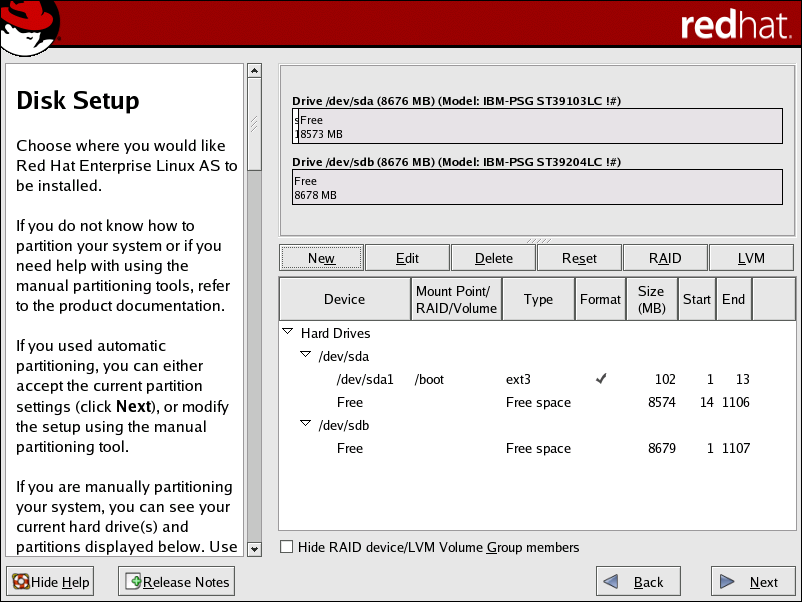
In a typical situation, the disk drives are new, or formatted clean. The following figure, Figure 8-2, shows both drives as raw devices with no partitioning configured.

 | Warning |
|---|---|
The /boot/ partition cannot reside on an LVM volume group because the GRUB boot loader cannot read it. |
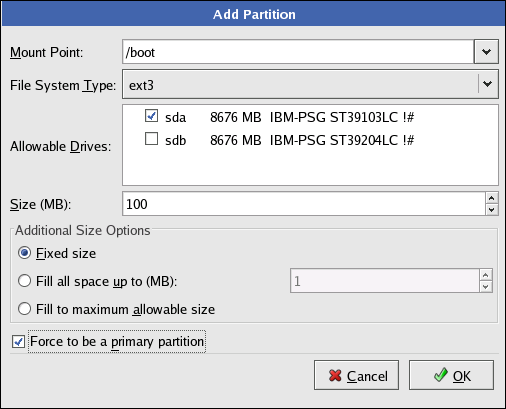
Select New.
Select /boot from the Mount Point pulldown menu.
Select ext3 from the File System Type pulldown menu.
Select only the sda checkbox from the Allowable Drives area.
Leave 100 (the default) in the Size (MB) menu.
Leave the Fixed size (the default) radio button selected in the Additional Size Options area.
Select Force to be a primary partition to make the partition be a primary partition. A primary partition is one of the first four partitions on the hard drive. If unselected, the partition is created as a logical partition. If other operating systems are already on the system, unselecting this option should be considered. For more information on primary versus logical/extended partitions, refer to the appendix section of the Red Hat Enterprise Linux Installation Guide.
Refer to Figure 8-3 to verify your inputted values:
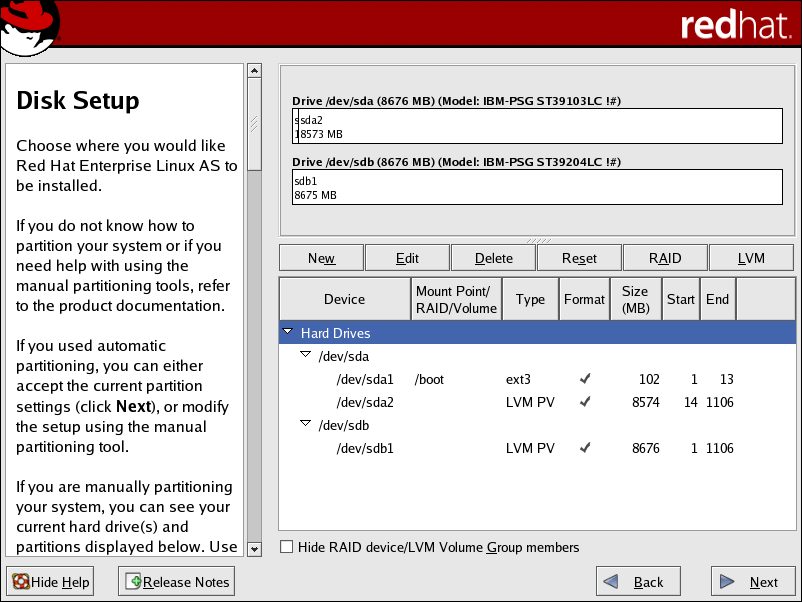
Click OK to return to the main screen. The following figure displays the boot partition correctly set:
8.2.2. Creating the LVM Physical Volumes
Once the boot partition is created, the remainder of all disk space can be allocated to LVM partitions. The first step in creating a successful LVM implementation is the creation of the physical volume(s).
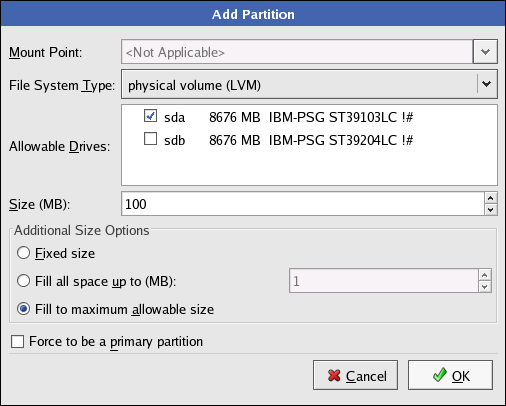
Select New.
Select physical volume (LVM) from the File System Type pulldown menu as shown in Figure 8-5.
You cannot enter a mount point yet (you can once you have created all your physical volumes and then all volume groups).
A physical volume must be constrained to one drive. For Allowable Drives, select the drive on which the physical volume are created. If you have multiple drives, all drives are selected, and you must deselect all but one drive.
Enter the size that you want the physical volume to be.
Select Fixed size to make the physical volume the specified size, select Fill all space up to (MB) and enter a size in MBs to give range for the physical volume size, or select Fill to maximum allowable size to make it grow to fill all available space on the hard disk. If you make more than one growable, they share the available free space on the disk.
Select Force to be a primary partition if you want the partition to be a primary partition.
Click OK to return to the main screen.
Repeat these steps to create as many physical volumes as needed for your LVM setup. For example, if you want the volume group to span over more than one drive, create a physical volume on each of the drives. The following figure shows both drives completed after the repeated process:
8.2.3. Creating the LVM Volume Groups
Once all the physical volumes are created, the volume groups can be created:
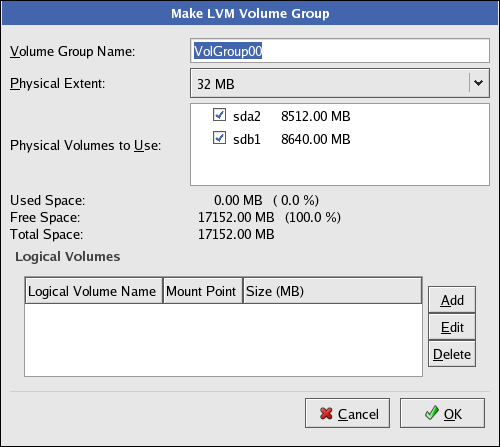
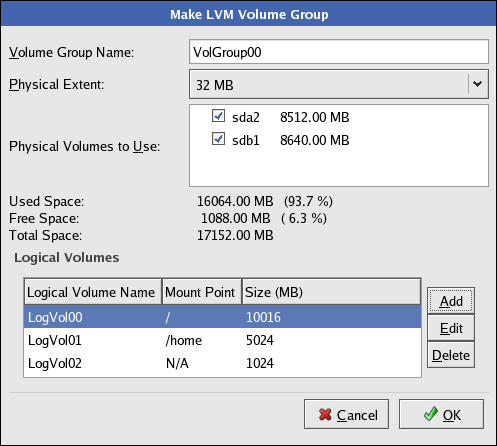
Click the LVM button to collect the physical volumes into volume groups. A volume group is basically a collection of physical volumes. You can have multiple logical volume groups, but a physical volume can only be in one volume group.

Note There is overhead disk space reserved in the logical volume group. The summation of the physical volumes may not equal the size of the volume group; however, the size of the logical volumes shown is correct.
Change the Volume Group Name if desired.
All logical volumes inside the volume group must be allocated in physical extent units. By default, the physical extent is set to 32 MB; thus, logical volume sizes must be divisible by 32 MBs. If you enter a size that is not a unit of 32 MBs, the installation program automatically selects the closest size in units of 32 MBs. It is not recommended that you change this setting.
Select which physical volumes to use for the volume group.
8.2.4. Creating the LVM Logical Volumes
Create logical volumes with mount points such as /, /home/, and swap space. Remember that /boot cannot be a logical volume. To add a logical volume, click the Add button in the Logical Volumes section. A dialog window as shown in Figure 8-8 appears.

Repeat these steps for each volume group you want to create.
 | Tip |
|---|---|
You may want to leave some free space in the logical volume group so you can expand the logical volumes later. The default automatic configuration does not do this, but this manual configuration example does — approximately 1 GB is left as free space for future expansion. |
Click OK to apply the volume group and all associated logical volumes.
The following figure shows the final manual configuration: